1982 BassTracker lll Transom Replacement

TinBoats.net

Help Support TinBoats.net:

This site may earn a commission from merchant affiliate links, including eBay, Amazon, and others.

possom813

Well-known member
Joined
Apr 25, 2011
Messages
95
Reaction score
0
Location
Corsicana Tx
I figured I'd take a lot of pics, just in case you want to delve into something like this, you won't be blindsided :mrgreen:

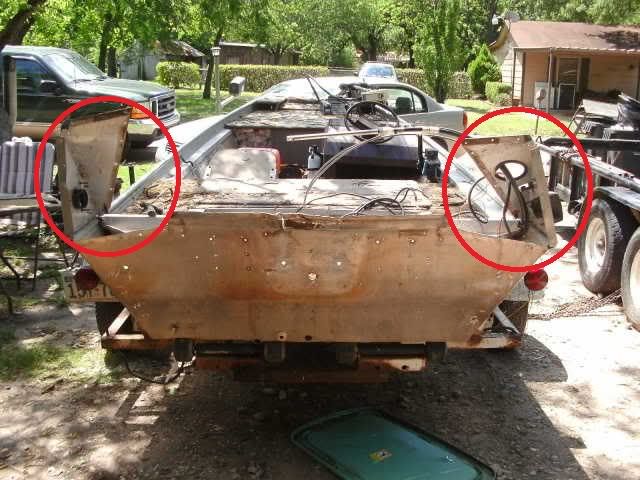
First, we start with a craigslist find...1982 BassTracker lll with a busted transom :shock:

40merc003.jpg


40merc012.jpg


Then we add some cusswords a porta power, and an air chisel :wink:

002.jpg


001.jpg


Then a trip to the local Home Depot for a slice of 23/32" sanded pine, not a marine grade, but it's getting glass'd, so no worries.

006.jpg


Then a trip to the dollar store, because it's close and I needed posterboard. And then an outside traced template, then modified for the inside with the actual measurments, and would you believe it was dead on the first time :shock:

009.jpg


And now, where we're at, just waiting so I can sand the edges to match up and fiberglass. Yeah, don't mind the vice grips, not a lot of clamps around here.

011.jpg
 
Nice Find. The lack of pictures from "Busted Transom" to "clean look" almost made me forget what a pain getting mine out was. :D
 
The transom, at least most of it, is in a large plastic tote from walmart, the rest was sucked up with the shopvac :wink:

I was knocking all the rivets out with a hammer and chisel when the wife said, "Hey, don't you have an air hammer?"

Ah, why yes, I do have an air chisel. I got it out and finished with just about all the rivets in about 30 minutes.

Now, just waiting for the glue to dry so I can go play with fiberglass :lol:
 
I didn't know I was supposed to?

I used Loctite PL Premium water proof construction adhesive.

Also, fiberglass sucks :evil:
 
I work with fiberglass for a living. When we build transom's with wood we always glass the two plys together. That makes it very strong. We have seen transom's fail in the past that were bonded together with other things. But what you have used is a good choice. If you need any pointers along the way let me know. looks like you are off to a great start.
 
I've got to wait for the tornado warning to go away before I can mess with it anymore and hope the rain coming into my carport sideways didn't hurt the curing fiberglass #-o

The next step is straightening up a couple of braces and reinforcing them with aluminum angle. Also, where the idiots broken the transom and the motor was bouncing into it, there's a nice little dent in the aluminum I'm going to have to try and beat out, the portapower won't straighten it and I can't pry it out.

I figure I'm going to whack it with a hammer on hammer action tomorrow and see if I can get it out far enough for the new transom to slide in.

Is there a pop rivet that I can buy to replace the rivets that came out of the transom and braces or am I going to have to use either galvanized or stainless bolts?
 
If you could find an all aluminum blind rivet then I think you would not have any problems. I could not find them when I did mine so I just used a regular rivet and sealed the outside. I wasn't going for looks, I wanted it to not leak and I wanted to go fishing.

Hopefully the rain did not mess it up too bad. If it was not completely cured you should be able to get it outside in the bright sun and it will cure. However if your going to have rain for the next few days I would get it somewhere where it will not get wet and put a heat lamp on it and move it around, to help it to cure.
 
I just finished pulling the transom out of my 89...some fun! I went searching for rivets as well to fill the 1/4 inch hole and found them at Fastenal. My issue is I did not want to spend the $255.00 for the super jumbo mega rivet tool for the 1/4 inch mandrels....I went with the pan head stainless bolts and nylock nuts. The bolts have a nice hex head in them and I can easilly use my cordless tools to make them tight.

I did learn one thing about the Stainless....Loctite needs a primer...Stainless does not oxidize enough to allow the material to cure.

I also used the Loctite adhesive by the way, I did not however have a sand bag to hold the sheets together so I used the plow off the wheeler!!!

Looks great! I'm right there with you in the project world, see you at the end!
 
I am putting a solid glass transom in an 81 Lowe, that a customer brought to me. His transom was bent so bad that it is about 3" from square. I got the transom wood out, but getting the aluminum bent back straight and then getting it welded up is my next priority. Then I will make the form and pour the transom.
 
I'd thought about going the seacast route, but didn't think I'd have enough room to seal off the brackets and whatnot to keep it intact.

It's in now, sorta, it's where it's supposed to be, but I still have 55 holes to drill and hope line up really close.

I put it in my little shop last night with a diesel heater running until it ran out 6 gallons of fuel :mrgreen:

It should be cured [-o<
 
Got it in :mrgreen:

A few minor details to iron out because I didn't think to get some 1" stainless screws to screw the outside to the transom where it doesn't bolt through.

I also have to wait for the JB Weld to cure on a 'make pretty' bracket that I broke #-o Whooda thunk, you can have too much hammer [-X

But it's in and I found my motor and will be picking it up in the morning [-o<

Here it is with the fiberglass and resin, before the final coat
003-1.jpg


The stripped out transom
004-1.jpg


005-1.jpg


Here it is, sitting pretty
011-1.jpg


All the shiny new ss bolts, well almost all of them, all of the really really important ones anyways
012.jpg


The broken bracket with JB Weld and where the other one goes, not devastating, but it did hurt my feelings
013.jpg


014.jpg


Hopefully will have the motor hung tomorrow [-o<
 
Only 55 holes! You got lucky! I got mine done yesterday and secured the gunwhale rail on the starboard side. I have to do some welding/filling of a lot of the holes that I dont need, and pull the bolts back out this weekend to seal them with 5200. Your ahead of me now!
 
Hi,

I have an exactly same boat as yours and am planning to replace the transom. Your post is so helpful.

I still have a few questions though, and definitely appreciate your clarification.

Q1: I see you used stainless steel bolts and nuts to replace the aluminum rivets. I believe you are using the same size as the rivets. How do they work?

Q2: In the following image 1 (I copied your images and put marks on them just for demonstration purpose, if you don't mind), how did you handle the drain hole before and after?
Image 1: https://i793.photobucket.com/albums/yy214/maoba/tx_tracker.jpg
tx_tracker.jpg


Q3: In image 2, I see you bend the two corner pieces. Did you cut the aluminum so you can pull them up? Did you weld them after the whole job? Will the strength be weakened?
Image 2: https://i793.photobucket.com/albums/yy214/maoba/tx_tracker2.jpg
tx_tracker2.jpg


Thanks a looooooot!
 
The bolts used were bought at fastenal and are 1/4x20 stainless 3 inches long. The rivets are real close to 1/4" diameter, so it wasn't a big stretch to use the bolts.

I'm cheap/thrifty/frugal, or whatever you want to call it :shock:

I drilled the holes and put a washer on the bolt to be on the outside, and then dipped the bolt in fiberglass resin, then put RTV Sealant on the washer and pushed it through the hole, put RTV on the inside with another washer and nut. Presto-Chango, from rivets to bolts. Not too difficult until you get to the rive/bolt holes in the extreme lower corners of the new transom, because of a 'pretty' plate that is in the way.

You have to constrict your hand and arm into that of a 3 year old so that it will fit :?


The drain hole at the bottom is not a problem at all, the transom doesn't go down that far. The upper drain hole, quite honestly, was ignored until everything else was done. I then bought a plastic, thru-hull fitting, found a drill bit about the same size, angled the drill up, made a hole, coated the outside of the thru-hull fitting with RTV and screwed it together.


The 2 corner pieces have to be cut. I made cuts all around the outer weld and then used a port-a-power to bend them up(and blew the dadgum seal on the port-a-power)

I bent them back down using heat, I've never welded them. With the new aluminum braces that I put in to replace the old rusty ones, there has never been an issue with strength.
 
Another question:

Did you use fabric when you 'glass' the board? or just used the rasin? I wonder if it gets too thick if using fabric.

Thanks.
 
I used the premade sheet of fabric from walmart around where the motor would mount(wrapped it around the transom) and just used the resin on the sides
 
Could you please kindly let me know what kind of epoxy/resin you used? How many coats? Thank you.
 

Latest posts

Top