Just bought a boat, what do i NEED to know?

TinBoats.net

Help Support TinBoats.net:

This site may earn a commission from merchant affiliate links, including eBay, Amazon, and others.

The_Karn

Member
Joined
Sep 10, 2012
Messages
12
Reaction score
0
I know not to use PT wood because it reacts with aluminum.
I know to use stainless screws/bolts
I know to use Spar Urethane or (i forget the other one) for coating the wood.
I know to drill the transom holes a tad bigger and coat the inside of the holes with varnish.

I want to start off small, this is the first boat i ever owned, but i have been on boats many many times.

All i want to do for now is repaint the boat, replace the transom, coat the inside with gluvit and coat the floor with truck bed liner spray or something similar.

Next year i plan on putting a shallow floor in the boat. But i have a few questions.

1. Would the truck bed liner spray and/or rubber spray be a good idea?

2. What is the easiest way to get the outline of the hull to cut out the wood pieces to shape? I imagine i don't have to be exact since they will be covered by carpet.

3. I know the seats reinforce the hull, if i took the center seat out, how would i replace that reinforcement?

4. Should i use anything to seal the bolt holes for the transom and anywhere else? Some kind of epoxy or marine silicone?

EDIT: Is there anything out there cheaper than Gluvit? How about something that is more common? I live in Door County Wisconsin and there are no marine or boat supply stores that sell it. There is a West Marine store here, but all they sell is "West Systems" brand.

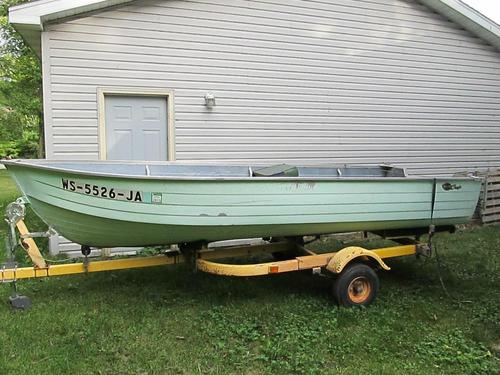
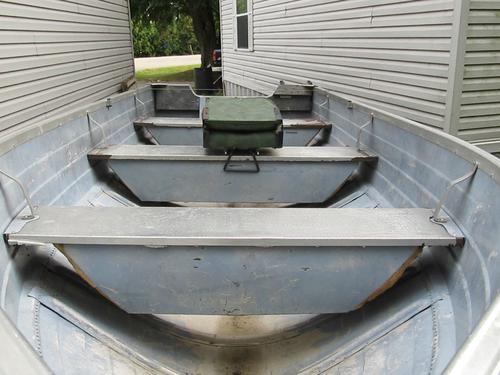
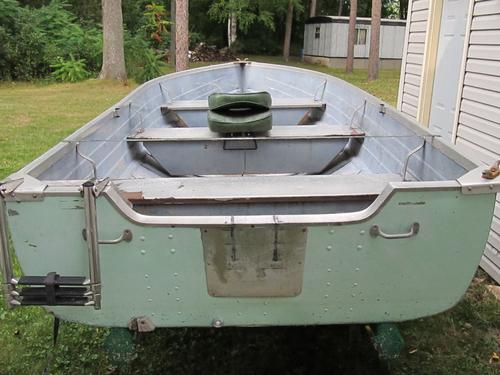
Thanks for any answers. Here are some pictures of my new boat. Its a 1973 14' Mirrocraft Deep Fisherman with a top width of 60"

rd7S7.jpg

R7UyK.jpg

16s10.jpg
 
Don't forget to pick up some of this when you start doing any assembly with SS bolts and nuts.
https://www.saftlok.com/safteze/antiseiz/s-steel.htm
It doesn't have to be that particular brand but failure to use anti seize will result in some twisted off bolts and galled threads.

One of the best products I've seen/used for sealing thru hull bolt holes like those in the transom.
https://solutions.3m.com/wps/portal/3M/en_US/Marine/Home/Products/Catalog/?PC_7_RJH9U5230GE3E02LECIE20S4K7000000_nid=BH94GLS0SRgsQH8HT14PGTglSW846R2R9Kbl
 
OK. Understand I am at the back of the class when it comes to renovation of Tin boats.
So, I'll mention maybe dumb stuff, but things I learned and encountered in my adventures.

1. If possible, use the boat before you change it. Sounds elementary, but there's a reason so many boats were made EXACTLY like the one you own. See what are real strengths and real weaknesses (in your eyes.)

2. Change for function first, then cosmetics. Flashy paint and flat screen TVs are neat, but work out the specs you want for the utility you desire. Casting platforms can be many heights, or not exist at all until later in your ownership.

3. It is going to cost more than you think...in tiny little eat-your-wallet increments.

4. It is hard as hell to row a boat without the middle seat.

5. There's this thing called "opportunity cost," that accountants are supposed to consider. It relates to the "cost" of the time you spend on one thing, or the investment you make in a thing that precludes you from spending that time or money on something else. Think about jobbing some work out, rather than spending a month planning, buying parts, sanding, scrubbing, trying to fabricate supports...when for a fee, it could be done in a couple of days.

6. And.....I got a tremendous satisfaction out of rescuing my tin boat, more than I have fishing from it, although I'm working on the fishing part.

Enjoy the journey.


Best wishes.
 
Hi and welcome to tinboats! It seems like you have done some good research so far on this site for your build learning the do's and don't's. I am not sure where you are from but I would hold off on any mods until (as said before) you fish from the boat a few times to see what you want out of the boat. You can plan or work on your mods during the off season and try to catch some hogs this fall. If you plan on decking the boat I would save your money on the truck bed liner since you will probably cover that up with the decking anyway. Gluvit... I know is expensive but the smaller can should more than work for your boat. Focus on the leaky rivets or seams. Making sure my boat doesn't leak is one area that I wouldn't want to skimp out on. If you would like to take out the middle seat I would do so with caution. I am no engineer but I made sure to bring the front deck back farther, the rear deck forward more and tied everything into the aluminum frame underneath for strength. I have noticed no flex or deformity at all in the hull after 2 years of hard use. As far as the height of your decking that is also up to you. I have seen builds where the deck was right at the gunnels, for me the perfect height was no more than the bench seat level. I am 6'2" 225 and I can stand on the deck no problem. I love the saying B.O.A.T. (Bustin Out Another Thousand) when it comes to larger boats but with our tins its (Bustin Out Another Twenty). It seems everytime I ran to the hardware store it was twenty bucks. It can quickly add up, but if you shop smart it will still be way cheaper in the long run to build your custom boat compared to buying a new one. I have around $2500 in mine, but that is boat, trailer, gas motor, trolling motor, gps + fish finder, bimini top... etc. over the course of two years slowly buying things as I had the money. Finally, you will have a blast designing and building your mods. More importantly you will know that you did it all yourself. Good Luck.
 
JMichael
Thanks, thats what i wanted to know, i saw a post about using a certain kind of adhesive sealant, but i could not find it again or remember the name. Does the sealant come off fairly easy if i ever have to replace again?

atuck593
So you are saying that the 1 quart can of Gluvit would be enough to coat the floor of my boat? If thats the case i would gladly buy a can for 40-50 dollars to be sure its sealed, i was planning on spraying the bed liner on after that just so that it would be easier to clean, as with the bare aluminum, dirt and grit get into the nooks and crannies and is hard to get out. Plus, i have no idea when i would add the floor and they say the Gluvit is not UV tolerant.

Originally i was planning on putting a floor in almost level with the current floor, just 1 or 2 2x2s underneath for support just set on the floor like puzzle pieces, i figured it would make for easy cleaning, and it would be easy to add something higher later if i so desired

i do have one more question.

I noticed on the outside of the boat, under the original paint, it appears that there is some kind of caulking/sealant on the bow seams. Does anyone know what this is, if it can or should be sanded off, and what i should replace it with if i do sand it off.
 
Read some of hte threads on rebuilding other tins, full of usefull information.

For example, you can remove the center bench seat. I did, actually I removed all the bench seats.

Build in my signature.
 
Hanr3

I have read MANY MANY threads on rebuilding/modifying boats, I rarely find one where they actually explain in detail how they did it. Most of them are like "I made a frame support out of 2x4s attached the plywood and glued on some carpet". There is rarely an explaination.

How is the frame attached to the boat, if it even is. How do you modify the lengthwise floor supports if the ribs in the boat aren't level?

There are many other questions i cannot find answers for because everyone seems not to explain it because i guess they assume its common knowledge.

From reading a lot of modify topics i was starting to come under the assumption that people just stick bolts through the bottom of the hull to secure floor frames. I still don't know if they do or not.

I am asking for help here, the basics basically.
 
The_Karn said:
JMichael

So you are saying that the 1 quart can of Gluvit would be enough to coat the floor of my boat? If thats the case i would gladly buy a can for 40-50 dollars to be sure its sealed,

You don't have to coat the entire inside of your boat with Gluvit. Just seams and rivets followed up with a top coat of something.

There is no reason to coat the flat aluminum floor unless it has leaks in it. Actually it would be rather dangerous as Gluvit dries very slippery.

Coat It is made by Goop and does the same thing but cheaper and dries black instead of clearish.
 
spotco2 said:
The_Karn said:
JMichael

So you are saying that the 1 quart can of Gluvit would be enough to coat the floor of my boat? If thats the case i would gladly buy a can for 40-50 dollars to be sure its sealed,

You don't have to coat the entire inside of your boat with Gluvit. Just seams and rivets followed up with a top coat of something.

There is no reason to coat the flat aluminum floor unless it has leaks in it. Actually it would be rather dangerous as Gluvit dries very slippery.

Coat It is made by Goop and does the same thing but cheaper and dries black instead of clearish.


Thanks, the Coat It is carried by a local place and i think i'll try that.
 
First off :WELCOME: I would take it out at least once to see where she leaks.....then spend several hours searching the completed mods. I am mid build but would be glad to help ya......as mentioned before, be prepared to spend some money. You are going to love this hull. All you have to do is ask questions, everyone will lend a hand.
 
One more thing, You can call Mirrorcraft and they can email you an exact template for the transom board. It is really not that hard to take off. You just have to take the bolts out of the corner caps and remove them. Take all of the bolts out of the transom brace, pull that cap off the top of the transom. You can then remove the old transom board. Use the old board as a template to make your new one. I used 2 pieces of 3/4 plywood, glued them together with Titebond III glue, and used fiberglass and gelcoat to seal....this is overkill but I had it laying around the garage so I used it. You could seal with less expensive spar urethane. You may also want to consider the time you will be spending on you boat, I have been working on mine since feb, but I am paying as I go, since I have to take care of life's priority's.
 
bigwave said:
One more thing, You can call Mirrorcraft and they can email you an exact template for the transom board. It is really not that hard to take off. You just have to take the bolts out of the corner caps and remove them. Take all of the bolts out of the transom brace, pull that cap off the top of the transom. You can then remove the old transom board. Use the old board as a template to make your new one. I used 2 pieces of 3/4 plywood, glued them together with Titebond III glue, and used fiberglass and gelcoat to seal....this is overkill but I had it laying around the garage so I used it. You could seal with less expensive spar urethane. You may also want to consider the time you will be spending on you boat, I have been working on mine since feb, but I am paying as I go, since I have to take care of life's priority's.


The corner caps are riveted on the side and bolted on the back, i think i can still wiggle the transom out without taking the corner caps off. The cap of the transom is just nailed to the transom, one of the nails created a crack. I think some JB Weld will fix the crack.
 
Welcome fellow mirrocraft owner my build is my signature it may give you some ideas. Like Big said just ask question someone here will help :beer:
 
bigwave said:
One more thing, You can call Mirrorcraft and they can email you an exact template for the transom board. It is really not that hard to take off. You just have to take the bolts out of the corner caps and remove them. Take all of the bolts out of the transom brace, pull that cap off the top of the transom. You can then remove the old transom board. Use the old board as a template to make your new one. I used 2 pieces of 3/4 plywood, glued them together with Titebond III glue, and used fiberglass and gelcoat to seal....this is overkill but I had it laying around the garage so I used it. You could seal with less expensive spar urethane. You may also want to consider the time you will be spending on you boat, I have been working on mine since feb, but I am paying as I go, since I have to take care of life's priority's.


I e-mailed Mirrocraft and they told me they have NOTHING except for a copy of the original catalog. I specifically asked if they had a transom template or color sample, they told me no.
 
I will look through my paper work I have a copy of the template......I cant remember the guys name, but I called and spoke to one of the managers I think. I gave him my serial number and hull size...he emailed me a copy of the mfg. template....he even told me that my year hull could be either 15" or 20" Transom. I had the 20". It really does not matter to have the template. You could trace the old one after you remove it. As far as the rivets go on the corner caps, they are not that hard to replace, but you will need the proper rivet size and gun to do it. Like I said before be prepared to spend money on tools and other things. When I started my mod I was very intimidated working with aluminum since I did not really have tools to do the work. Little by little I have purchased the things necessary cut,rivet,fasten, aluminum. I can guarantee this will not be the last boat I mod. I already have my eyes set on a old style bowrider like many have done on here. It will be the silver bullet, but that is another story and a few thousand dollars down the road. :lol:
 
bigwave said:
I will look through my paper work I have a copy of the template......I cant remember the guys name, but I called and spoke to one of the managers I think. I gave him my serial number and hull size...he emailed me a copy of the mfg. template....he even told me that my year hull could be either 15" or 20" Transom. I had the 20". It really does not matter to have the template. You could trace the old one after you remove it. As far as the rivets go on the corner caps, they are not that hard to replace, but you will need the proper rivet size and gun to do it. Like I said before be prepared to spend money on tools and other things. When I started my mod I was very intimidated working with aluminum since I did not really have tools to do the work. Little by little I have purchased the things necessary cut,rivet,fasten, aluminum. I can guarantee this will not be the last boat I mod. I already have my eyes set on a old style bowrider like many have done on here. It will be the silver bullet, but that is another story and a few thousand dollars down the road. :lol:


I was reading your 1984 Deef Fisherman topic and i noticed you said you used 5200 on all of the seams on the hull. Was this on the outside or inside? How hard does the 5200 dry? Does it get really hard, or does it stay slightly soft?

Your topic is very informative and you explain things very well, i think i will be using your topic as a basis as to how i'm going to repaint my boat and apply the coating to the inside floor. I just washed the inside out yesterday, and i was amazed as to how much gunk and crap gets underneath the ribs inside the boat, it was like neverending gunk, dead bugs, and flotsam.
 
Thank you for the complement. I can not take all the credit though.....thanks to this great site I learned most of what I have done so far from asking questions and reading other peoples mods. The 5200 does not get super hard once it cures....but it is harder than silicone. I placed a bead along all the seams especially on the lower bow. This was precautionary since my hull let in very little water to begin with. My boat is currently setting outside with about 6" of water in it from the tropical storm last week. I did not plan it that way but mother nature lent me some water for another leak test.
The gutters between the ribs do collect debris, If I get my deck the way I want it, there will be little chance stuff can clog them. My advise is to just take you time and try to do things within your abilities. If you think it is over you head then ask for advise or take you boat to a professional welder to tackle the things you can not do. To me it is a type of therapy trying to figure out how to make my boat the way I want it. Our hulls are very stable and functional for just about anything. I hope to have most of the decking coated and installed this weekend.....then I will give some attention to the outside hull and trailer. [-o<
 
New to this site. Just bought a 1973, 16 foot Mirrocraft Deep Fisherman. Cannot read the hull plate with th boat specs. Can anyone tell me the weight of the boat, Horse power rating and capacity (number of people and or total weight as listed on Coast guard plate.

Many thanks
Edward
 

Latest posts

Top