New guy doing a 14' smokercraft overhaul

TinBoats.net

Help Support TinBoats.net:

This site may earn a commission from merchant affiliate links, including eBay, Amazon, and others.

HickInTheSticks

Well-known member
Joined
Apr 25, 2015
Messages
55
Reaction score
0
What's up guys? I have a thread in the projects section (kinda missed the *completed* part, whoops) that I'll use to follow my complete project, I'd like to ask my questions over here in this thread though, to keep the project thread pretty clean.

Not really intending for this project to take very long, I got a lot of free time on my hands at the moment, so my goal is really to see how quick I can get it back on the water.

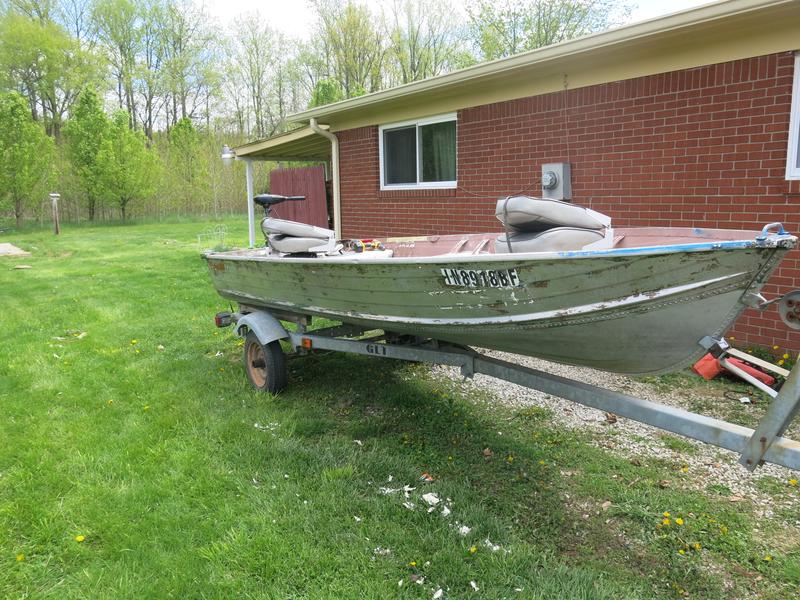
Anyway, about the boat. I believe its a 1984 SmokerCraft Canadian model based on the size. 13'6" length, 57" beam. Came with trailer and a small 30 lb thrust trolling motor.

tkQ51gt.jpg


IZl18hq.jpg


I stripped off the exterior paint mostly using a chemical stripper and a wire brush and followed up with the interior. Minus the benches which for some odd reason is not coming off with a stripper.

erPm47p.jpg


Gonna be going to the hardware store and grabbing a fine-grade wire wheel for my angle grinder. Used a small one on my drill for the stubborn paint and it was doing a real good job (the coarse grade wire worked faster but I don't want to take out too much aluminum) so I figure a larger wheel at a higher RPM will get the job done pretty quick, as well as scuff up the surface properly.

So basically just gonna hit it with a wire wheel, repair any screw holes with JB water weld epoxy and sand it down appropriately... another wash with mineral spirts and then prime it (Rustoleum aluminum primer, roll on method) followed by paint.

Then on to the deck....

Sound like a good plan?
 
Also I can't find any like, durabond or whatever its called for the interior. Will only be building a partial deck with below-deck storage, I want the deeper bottom for my toddler son and dog... wanted to coat it with something rubberized for grip and sound muffling. Saw some spray-can truck bed liner... anyone got experience with that?

Edit to add most recent pics taken 5 mins ago. Won't be able to do more work until later tonight. Went ahead and took off the ID numbers on the boat to motivate me to get it done quicker. Can't just go drop it in the water anymore! Want it painted ASAP.

10350446_10101091130862124_4604213750611960949_n.jpg

11182092_10101091131066714_597600774998019721_n.jpg
 
I'm looking at gator grip by anvil paints. It's outdoor deck paint and has texture. Not sure if it's a solution or not but it's cheaper I think...
 
Thanks, man! Been delaying painting because its been so nice outside I keep wanting to put it on water. Though, the outside is ready for primer and paint. Don't really want to paint it until I'm actually ready - I *think* I need another keel roller on my trailer... my boat scrapes until it comes to rest on the first keel roller (located mid-trailer). I feel like putting a roller on the first bar it comes in contact with is going to save my paint. Dont want to paint it just to scrape it off the first time I trailer it.

So...I've slightly shifted my focus now onto decking... I still have no idea how to attach the deck frame to the boat. My boat has no ribs up the side of the hull to tie the frame into. Picked up some 5/8" CDX for the platform though. Gonna do a template and then I'll coat seal it real good after cutting so all sides are fully sealed. Then another coat of sealant after I attach it to the frame.

But... attaching a frame to aluminum hull... how do you guys do it? Seems most boats have ribs running up the side of the hull making for a pretty convenient anchor point. I don't have 'em, unfortunately. Need to figure out how much lumber I need so I can get to cutting/sealing it all.
 
HickInTheSticks said:
But... attaching a frame to aluminum hull... how do you guys do it? Seems most boats have ribs running up the side of the hull making for a pretty convenient anchor point. I don't have 'em, unfortunately.

I'd go through the outside of the hull (screws/bolts) if not going to weld. Drop some vertical supports to the ribs on the bottom.

My 2 cents.
 
I found another guy who attached his entire deck to just the benches. He posted this image on another forum -

Frameclamps.jpg


Mine won't quite attach exactly like that (my benches have a lip) but the idea works for me pretty well - then I can set it up as a "quick-detach" type deck where a handful of bolts with nuts (maybe wing-nuts, for quick removal) are all that is securing the deck to the boat.

Especially useful since I have a rather weak motor for the time being (30 lb thrust transom trolling motor for a 14' boat...) this will allow me to pull the deck off if its too heavy until i can upgrade the motor.
 
Spray on truck bed liner I tried is very gritty. No slipping but really hard on bare skin.
 
Just finished the second coat of primer. Gonna give her a final light sanding, wipe down with mineral spirits, then goes the paint. Still have to do the interior, of course.

10418447_10101101999511264_8897315931711588688_n.jpg


Don't know if I mentioned it, but gonna go with white below the water line and all of the trim/lettering. Gonna stick with green for above the water line.

For the transom lumber... the correct way would be to cut and pre-drill all holes, paint it then seal it and assemble with 5200 on all bolts?
 
Would this seem appropriate for my boat?

13'6" x 57" beam

I'm ASSUMING the following:

700 lb capacity
15 max hp

Really concerned about the weight capacity. Not that I ever really PLAN on it, but if I were to take out my entire family, we're looking at 450 lbs (200 + 150 + 70 + 30)

9.9 - 15hp outboard motor plus tank/fuel/accessories is 120 lbs

two batteries are 110 lbs

trolling motor...30 lbs

That's already over the weight limit without a deck or any kind of gear!. Deck is gonna add what, 50-75 lbs? Even if it was just my wife and myself that's 350 lbs and right at capacity weight without a deck or gear.
 
Just applied the 2nd coat to the bottom. Not sure if I'm doing another coat yet, will know by tomorrow. Also got my trailer mostly disassembled and coated in primer. No pic of the trailer tho.

11165268_10101105583473974_1616216636873288973_n.jpg
 
Thanks man! Little bit slow, but at least its going.

Found a nice little motor on CraigsList not too long ago, gonna go check it out tomorrow. The owner says there's only about 12 hrs on the motor. Said I could have it for $300. Would need a tank and line, about all I know about it. He said he could probably rig something up so I can see it running.... Not really sure of the year of the motor.

Best part is I looked up the Mercury 6hp motors, and they only weigh 55 lbs! :D

11128625_1444182725876015_5426371768111458449_n.jpg
 
That sounds like a good price for the 6hp. I'm not sure if it will plane your boat though. I would go with the max hp your boat is rated for. I run a 30 hp on my 14 footer.
 
Weight is my biggest concern right now. Not really worried about planing out since my primary fishing spot is electric-only motors, I just want a fuel outboard for some of the bigger lakes locally to get around a bit faster than my TM will push me.

If it can push me 10 mph, I'll be happy with it. I initially wanted a 15 hp motor, but the one I was looking at was 118 lbs.... this is only 55 lbs.
 
Well, I'm sticking with just 2 coats of paint. Still gonna go around it and do touch-up from where the paint ran under the tape a few places and a spot or two where the tape pulled paint off (I waited 24 hours....) and where I accidentally scuffed it with some sandpaper :twisted: But overall I'm pretty pleased with the way it looks!

Still need to finish up the trailer as well, I disassembled it to paint and didn't get the upright arm in front of the boat yet, and I got some rattle cans for the wheels - rusty metal primer and white paint. Will end up replacing all the lights (busted plastics all around) as well.

11304459_10101113994408394_132740427_n.jpg


11303415_10101113994478254_1528600842_n.jpg


Started a template of the deck. Not liking the way its turning out. I need to build the framework first, then lay thinner cardboard (like poster board) on top of the frame. Was a good practice run, anyway.

11119821_10101113994518174_1860079644_n.jpg
 
Got all my lumber cut and drilled for the transom and bow deck. Painting those and coating in spar urethane. Spent the rest of my evening getting the frame ready. Just gotta get the door hatch framed in where I'm putting them and ready to get the plywood cut hopefully tomorrow.
 

Attachments

  • IMG_20150521_212518_854.jpg
    IMG_20150521_212518_854.jpg
    48.8 KB · Views: 441
Framework finished minus actually mounting it. Gotta seal it up first!

The frame on the rear of middle bench is going to house a utility panel. Switches, USB/aux outputs, etc. Was thinking about using 2x4 for this frame and installing speakers in the cavity but I think I'll stick with portable speakers.
 

Attachments

  • IMG_20150522_150328_005.jpg
    IMG_20150522_150328_005.jpg
    42.4 KB · Views: 432
Deck and switch panel cut. We got a solid week of rain coming so I'll be sanding/sealing it in the garage. Still gotta cut the hatch doors but otherwise all wood is done.
 

Attachments

  • IMG_20150522_171224_309.jpg
    IMG_20150522_171224_309.jpg
    61.4 KB · Views: 432

Latest posts

Top