Angle Aluminum Advice

TinBoats.net

Help Support TinBoats.net:

This site may earn a commission from merchant affiliate links, including eBay, Amazon, and others.

Brine

Moderator
Moderator
Joined
Jan 18, 2009
Messages
3,236
Reaction score
0
Location
TX
As I've looked through many of the pics of mods on aluminum angle framing, I have a hard time finding similar construction methods. Specifically, If it gets riveted or screwed, the number of rivets/screws per connection, the amount of support both horizontally and vertically etc.... I understand that it's ok for everyone to do it differently, because we all want different things out of our build, just wondering if any of you had to do it over again, knowing what you've seen and know now, would you do it any differently?

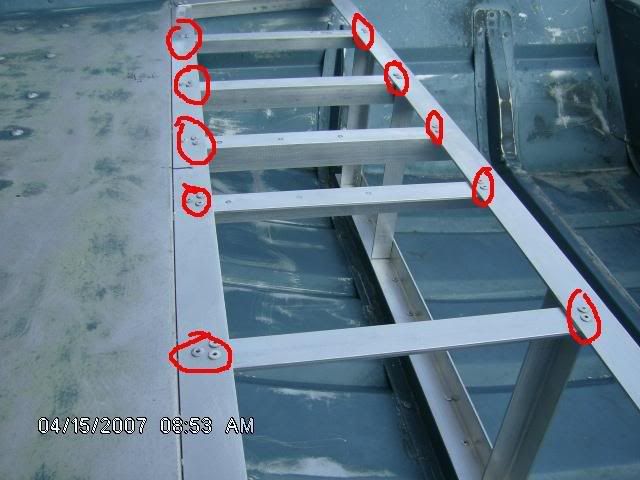
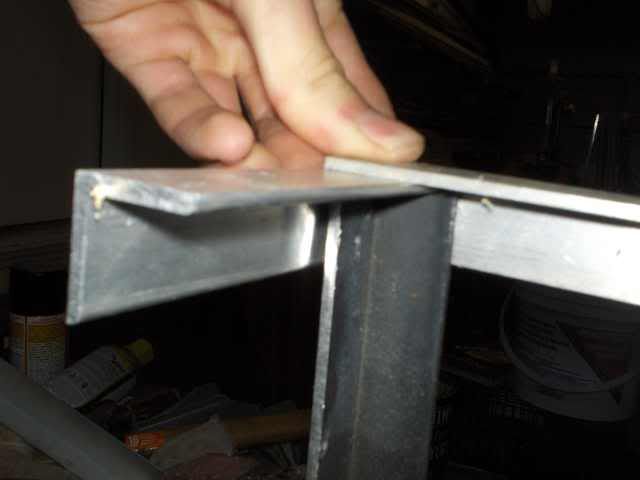
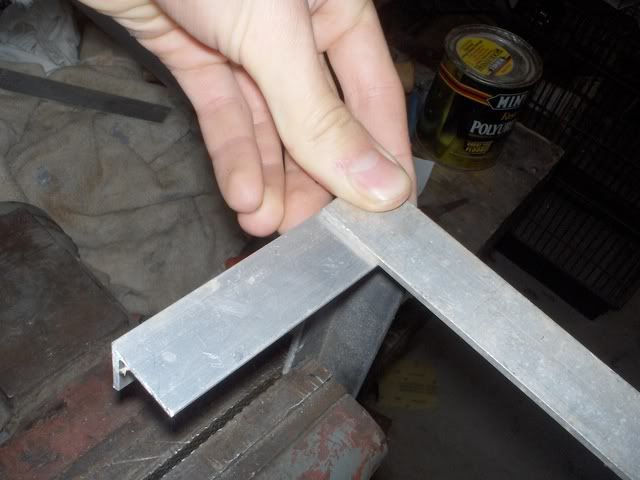
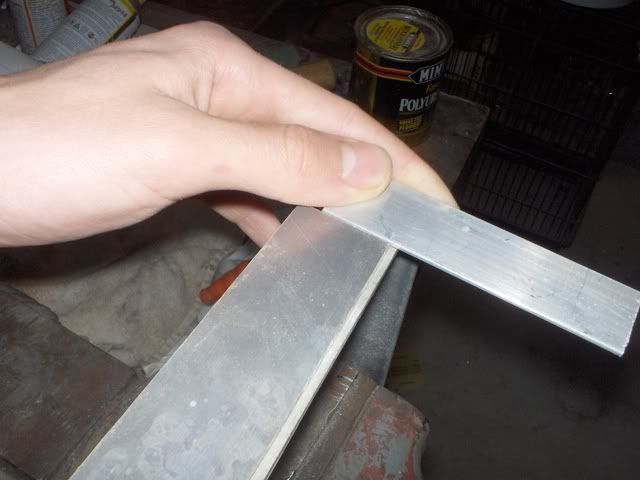
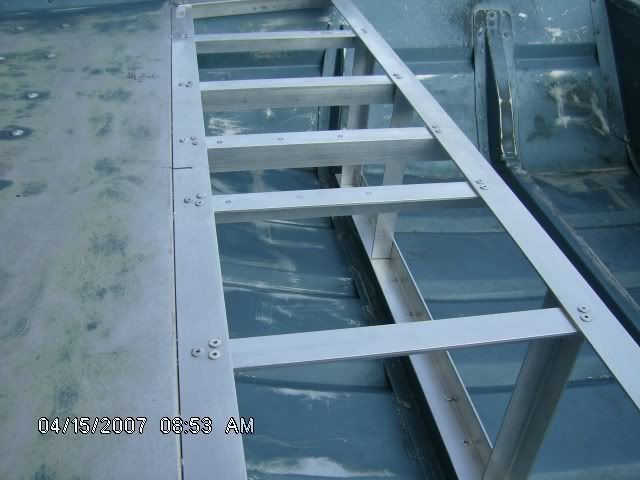
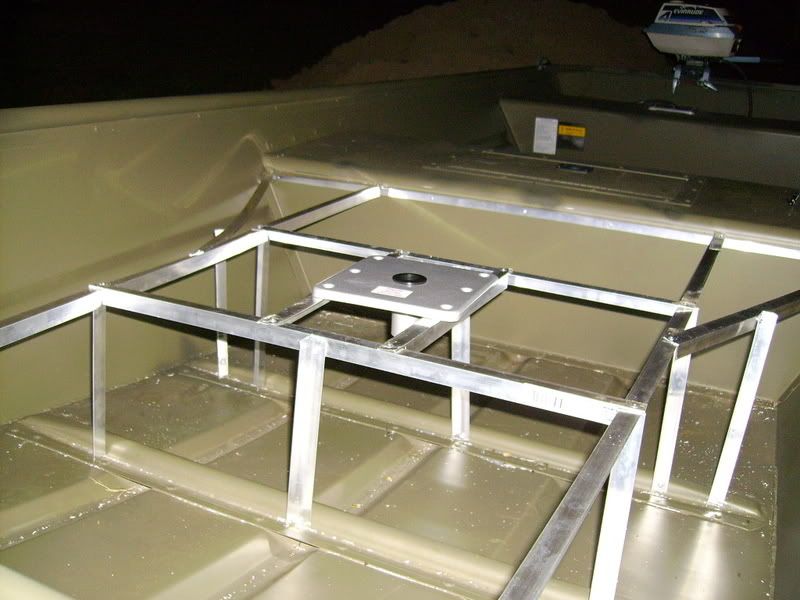
Also, I've seen some folks notch there angle to "fit" into another piece. It looks like this would weaken the connection. Are pop rivets an ok choice for load bearing applications? I'm realizing that I need to post a pic to help explain one of my questions. I will try to post it from another site.
 
Ok, here is an example. This picture makes me ask a couple questions.

1. Why use 3 rivets on one side and not the other.
2. Is the framing method here (meaning how the pieces are positioned in relation to each other) the right/best way to do this?
TonysDeck.jpg


I'll look for another pic to show a different method
 
With all my structure, I tried not to put the downward load as shear on the rivets. All of my horizontal structure that the deck is attached to is on top of the vertical piece, so the load is transferred downward directly to the column, and the rivets just keep everything together. Now, they should be strong enough otherwise. I know a guy who has the motor mounts for his Chevy 350 Inboard/Outboard attached with 3/16 pop rivets to the hull. And, this isn't the sort of guy who would put the absolute minimum on there either. If he puts it there, it works well.

As far as 3 rivets on one side versus the other, I don't know.

That picture kind of demonstrates what I was saying. The horizontal piece is transferring the load directly to the vertical supports, and the rivets aren't holding anything. However, I would have put the lengthwise pieces on top of the transverse piece, as opposed to riveted under it. I also wouldn't have had exposed rivet heads right under the deck. Doesn't seem like a solid enough fit for me. If I had to use that shape of construction, I would have riveted the 2 angles and the deck together with the same rivet. That way, the decking is not sitting on top of rivet heads, plus it saves rivets.
 
Look at the next few pictures (links to my shareproject page) of my rig.
https://www.shareaproject.com/pages/imageDetail,p,482,i,8135,00.html

https://www.shareaproject.com/fullImages/8133.jpg

As you can see, all the horizontals are on top of the verticals, and the angle brackets are there to hold the pieces from falling down. But, the rivets are under very little load. On my bow deck, especially in the second picture, look how the structure is. The transverse tubes are directly on top of the legs, directing any force straight to the legs. Now, my lengthwise structure is on top of that. All the force on them is directed to the crosswise pieces, down to the legs. If I went with a single level structure, I would have to do fancy notches in the pieces to keep them at one level, or have one direction riveted in shear. Neither one of those made me happy, so I opted for a double layer structure. Except for the gusset to the rib on the right (demonstrated with a piece of white cardboard in that pic) there are no load bearing rivets.
 
Jirwin,

Yours is actually one I was comparing it too.
NotchedAngleFraming.jpg

It appears you actually notched some of your angle. If I were building a structure out of wood, I would do the same thing, but it makes me wonder if notching the aluminum doesn't weaken the integrity?

How have your decks held up? Have you noticed any problems?

Thanks, and you've got a great looking boat!
 
Dang it bassboy! hang with me. I know there is valuable information in what you are saying here somewhere. :lol: I just need a minute to find it. Help me along here....
bassboy1 said:
With all my structure, I tried not to put the downward load as shear on the rivets. All of my horizontal structure that the deck is attached to is on top of the vertical piece, so the load is transferred downward directly to the column, and the rivets just keep everything together. Now, they should be strong enough otherwise. I know a guy who has the motor mounts for his Chevy 350 Inboard/Outboard attached with 3/16 pop rivets to the hull. And, this isn't the sort of guy who would put the absolute minimum on there either. If he puts it there, it works well.
I'm following ya so far =D>
bassboy1 said:
As far as 3 rivets on one side versus the other, I don't know.
Kewl =D>
bassboy1 said:
That picture kind of demonstrates what I was saying. The horizontal piece is transferring the load directly to the vertical supports, and the rivets aren't holding anything.
still with ya.... [-o<
bassboy1 said:
However, I would have put the lengthwise pieces on top of the transverse piece, as opposed to riveted under it.
still with you, but fading :oops: [-o<
bassboy1 said:
I also wouldn't have had exposed rivet heads right under the deck. Doesn't seem like a solid enough fit for me. If I had to use that shape of construction, I would have riveted the 2 angles and the deck together with the same rivet. That way, the decking is not sitting on top of rivet heads, plus it saves rivets.
No Problem, I completely understand :---) #-o
Help me out with this last part. How would it go together?

Also, not sure if you noticed, but in the first pic, he actually has his pedestal base marked out. Just seems like that construction is backwards to carry a load.
 
jirwin6985 said:
Thanks for the compliment Brine :beer: Again i just kinda put it together as i went. Notching the aluminum may have weakend it some but i have no problems at all with is strength. My deck is rock solid i have had 400lbs on the front deck after my buddy hooked himself with n squeks. So far its held up great. Bassboy does bring up some great points but the way i did mine was cheap(not afraid to admit it) I diddnt have to buy more aluminum for the bottom and diddnt have to cut tons of brackets. Mind you bassboy did it the right way and i did it cheap but i have no complaints. IM currently collecting more aluminium so I can redo my boat in all aluminum. The only thing I will say is the thicker the aluminum you use, the less bracing it will need. Wich will save you alot of work in the end. I wish i had gone thicker the first time it would have saved me a whole days worth of work of cuting and fitting.

Thanks again bud. I appreciate the candid feedback.
 
bassboy1 said:
Look at the next few pictures (links to my shareproject page) of my rig.
https://www.shareaproject.com/pages/imageDetail,p,482,i,8135,00.html

https://www.shareaproject.com/fullImages/8133.jpg

As you can see, all the horizontals are on top of the verticals, and the angle brackets are there to hold the pieces from falling down. But, the rivets are under very little load. On my bow deck, especially in the second picture, look how the structure is. The transverse tubes are directly on top of the legs, directing any force straight to the legs. Now, my lengthwise structure is on top of that. All the force on them is directed to the crosswise pieces, down to the legs. If I went with a single level structure, I would have to do fancy notches in the pieces to keep them at one level, or have one direction riveted in shear. Neither one of those made me happy, so I opted for a double layer structure. Except for the gusset to the rib on the right (demonstrated with a piece of white cardboard in that pic) there are no load bearing rivets.

Ok, I understand all of this I think!

Will this same method work with angle, or is this only suited for square?
 
bassboy1 said:
I also wouldn't have had exposed rivet heads right under the deck. Doesn't seem like a solid enough fit for me. If I had to use that shape of construction, I would have riveted the 2 angles and the deck together with the same rivet. That way, the decking is not sitting on top of rivet heads, plus it saves rivets.
No Problem, I completely understand :---) #-o
Help me out with this last part. How would it go together?
[/quote]
TonysDeck.jpg

See the rivets I circled in that picture? If he slaps the deck down on top of that, it will be perched atop rivet heads, as opposed to on flat angle. Now, he could eliminate that issue, that issue by putting the decking sheet between the crosswise (in relation to the boat) angles, so it would be flat, but it would be kinda backwards, like you mentioned. The load is pushing straight down on rivets, putting them in tension. When I mentioned use the same rivet to install the deck, what I was saying was instead of installing the circled rivets when he did, he could have waited until he cut and fit the deck sheet. Then, he could drill through the sheet, and through both angles, and allow the rivet to attach all 3 together. Does that make any more sense, or am I still talking in a language only the bassboys of the world understand? :lol:

Hang on just a second with your next question. I am going to take a picture of a model to get my point across. I have absolutely no clue how to word it correctly.
 
bassboy1 said:
Does that make any more sense, or am I still talking in a language only the bassboys of the world understand? :lol:
=D> =D> =D> =D> =D> =D>

Got it....other than he decided to use a plywood deck :lol:
 
Got it....other than he decided to use a plywood deck
Ah, well, the exposed rivets pose less of a problem there, as they will squish into the plywood.

Anyway, here is the answer to the question of how that can be done with angle. I grabbed a few pieces out of the scrap bin.
Say this is how you do your legs. The piece in the vice is the leg, and the pieces I am holding are your horizontals. One piece (top one) can extend both ways, making a T. If you need to make an X, or lower case t (depending on how you look at it :lol: ), you will need a second leg, or a different method.
angledemonstration001.jpg


angledemonstration002.jpg


That works, except now you have an eighth inch height difference in the two angles. Solve that by putting a piece of 1/8 inch flat bar in the low places. If your angle is 1.5 inch, the bar needs not be more than an inch wide.
angledemonstration003.jpg

Obviously the piece I grabbed isn't the same thickness, or width, but I didn't feel like digging further, or cutting a piece down, so that should get the picture across.
angledemonstration004.jpg


Don't put a rivet in your spacer until it comes time to put your deck down. Then, rivet all the way through it. Same goes for the tops of the corners, where my thumb is. Put rivets in the side, but then have the top one go through the deck into both layers, after you get your deck installed. Will lock everything together, and keep things from flexing.

Obviously there is more than one way to skin a cat. This is just my method. Cheap and easy works just fine for most people, but for me, I am building the boat just as much for the sake of building the rig as I am to have a boat the way I want it to fish out of. Since building it is more than half the fun of both building and fishing together, at least to me, you can bet I will go for overkill, especially when it comes to playing with aluminum.
 
Where is the lightbulb turning on smiley??? :lol:

Thanks!
 

Latest posts

Top