You are using an out of date browser. It may not display this or other websites correctly.
You should upgrade or use an alternative browser.
You should upgrade or use an alternative browser.
1960 evinrude 18hp fastwin spark issue (VIDEO UPDATE)
- Thread starter bikeordie092
- Start date

Help Support TinBoats.net:
This site may earn a commission from merchant affiliate
links, including eBay, Amazon, and others.
sixgun86
Well-known member
One of them goes to your kill switch I do believe... Trying to think what the other is off top of my head. They are important and prob reason you don't have spark. Those fastwins are indestructible. Good motor.
bikeordie092
Well-known member
there is no kill switch on this one, might be another problem? i have a 67 18hp fastwin and it has an ignition switch that looks just like the on my murray lawn mower.. but that one is also electric start.. this 60 is not... also there is some type of an "access hole" on the flywheel where u can see the points and such and everything under there looks brand spankin new...so unless i find something else out that i would need to take off the flywheel for, i believe im not going to trouble myself taking that off... btw those are the ONLY 2 wires i see coming off that motor.... if anyone else has a 60 and knows anything about this would be of amazing help...
bikeordie092
Well-known member
ok, so this motor officially is not getting any spark.... the points and such look brand new, but i was going to take the flywheel off anyways, whats the best way to do so? something like a harmonic balancer puller? that will go in the three holes around the center bolt? i also tried connecting the 2 wires on the side of the motor... nothing.. anyone have any suggestions as to what these wires go to? im sure one of them has to go to a kill switch, but idk what the other goes to, and idk which one goes to the kill switch either. i need help! lol any input is well appreciated.
bikeordie092
Well-known member
oh yeah, on the kill switch thing, there is a spot where it seems there was some sort of a switch at some point, but it is gone now... could also be a part of the problem? and i added a couple pics of the points cuz i know how we all are on here with pics  got the flywheel off pretty easily btw
Attachments
bikeordie092
Well-known member
well, today i figured i would put the flywheel back on and give it a whirl for the heck of it, and it shocked the crap outta me lol... but that means IT DOES HAVE SPARK!! so now we go on to rebuilding the carb and checking the impeller and then we see if it starts!
cajuncook1
Well-known member
- Joined
- Mar 24, 2010
- Messages
- 437
- Reaction score
- 1
Put this together for someone on another forum, but I think it might help you out with your ignition inspection and diagnostics.
Your going to need to inspect your point, condenser and coils. They are located under the flywheel. Hopefully all you need to do is clean and regap your points and you might be in business. Still check your coils and condensers and plug wires.
Here are two link to show you how to test your coils and condensers.
https://www.youtube.com/watch?v=KT8rk5QWgS0
https://www.youtube.com/watch?v=l6eSXYmENDY&feature=mfu_in_order&list=UL
Here is a diagram of a generic OMC (Johnson/Evinrudle/Gale) ignition assembly. You will have to remove the coil designated for the top cylinder and put the oil wicker in. It should be already be coated with a very light oil. (not grease). The purpose of the oil wicker is to lightly lubricate the outside riding surface of the cam so the point shoes do not prematurely wear. If you look at the points they have little shoes that ride along the cam. Please make sure the (breaker)points cam is on the correct side or the ignition will be out of timing. It should have the word [highlight]top[/highlight] machine written on the side facing up.
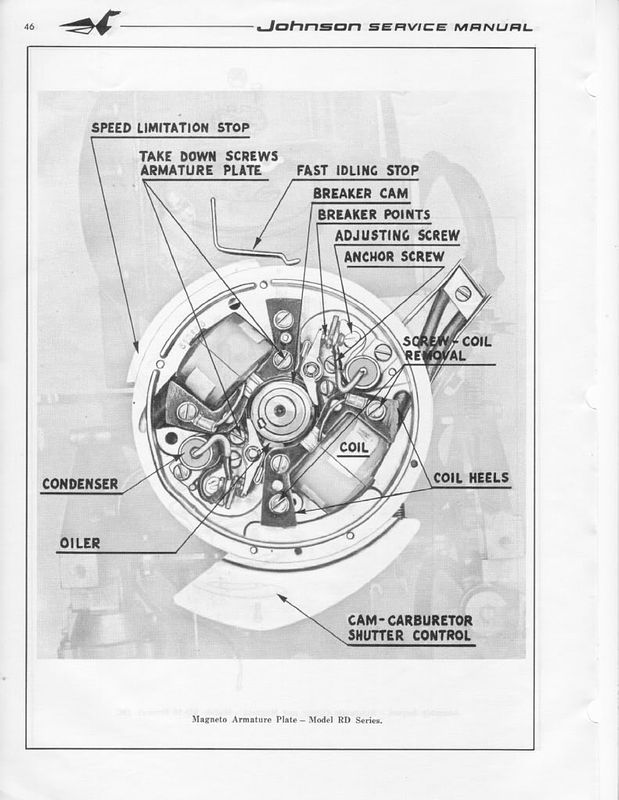
FYI: You can only set(gap) one set of points at a time. Put the flywheel nut back on(turn with a wrench or ratchet clockwise) to allow you turn the crankshaft. (Please remove both spark plugs to make it easier to turn the crankshaft and prevent accidental starting)
You gap the point to 0.020 when the point shoes is at the top(high point of the cam). It should have a mark along with the word top. Then you will turn clockwise to the next set of point 180 degrees and set those points the same way. You will notice that the point of the previous set will be closed and when you come around again they will open up. *** When they are open no current is allow through. This is how you set your timing with the points.***
When you go to set the point's gap. Very gently snug the anchor screw, then adjust the gap with adjusting screw and the feeler gauge until the feeler gauge is sliding through with slight resistance only. Then tighten the anchor screw. Repeat procedure with second set of points. Please make sure your hands are clean and the feeler gauge is clean, because oil on the points can foul them up and create resistance....poor or no no spark. ALways use a spark check to evaluate spark. It should jump minimum 1/4 inch. Blue sharp snappy spark.
Here is a picture of a spark check...Cheap $6
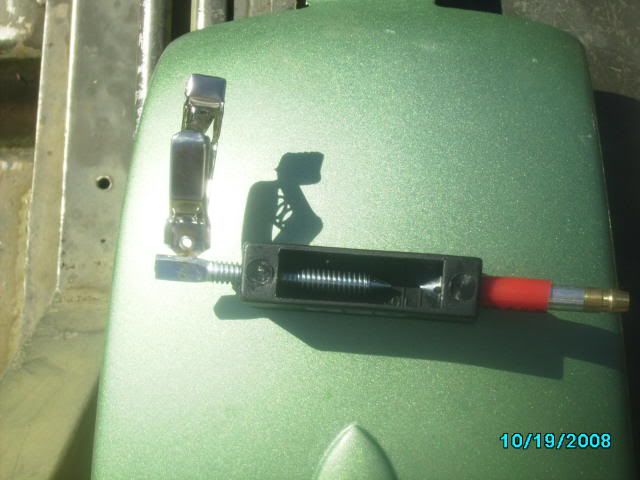
Here is a picture of how to tell which wire is going to the correct cylinder. Thanks to Garry for providing the picture on other post.
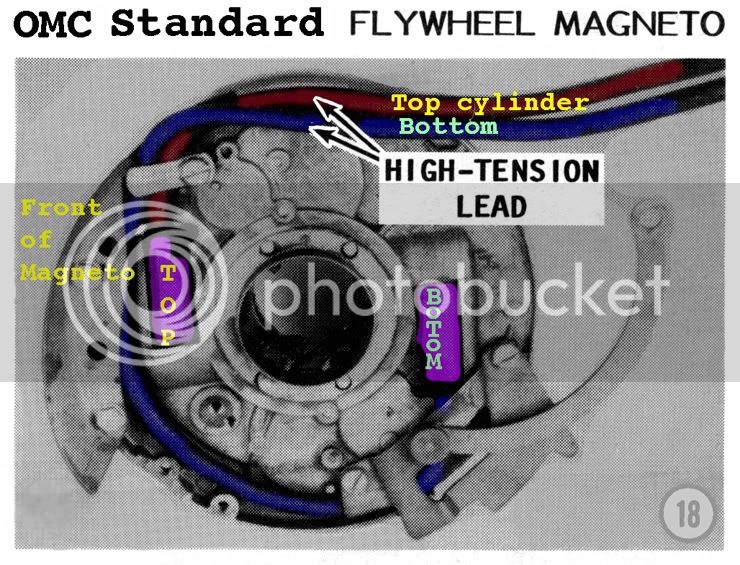
If your using the existing wires then cut about 1/4 inch of end going the coil, so you have clean un-oxidized copper contacting the spiking in the coil. Twist the end of the spark plug wire onto the coil spike. If you have replaced the wires, make sure they are 7mm copper metal core and not the automobile stuff.
***** Please make sure two things*****
1.) Make sure all the wires are tucked away under the flywheel and not rubbing up against the cam or crank, because with will eventually get damage and create a short, then no spark!!
2.) Make sure the coil heels (ends) are evenly lined up with the mounting boss.
Here are some pictures. (Compliments of JBJennings..nice fella)
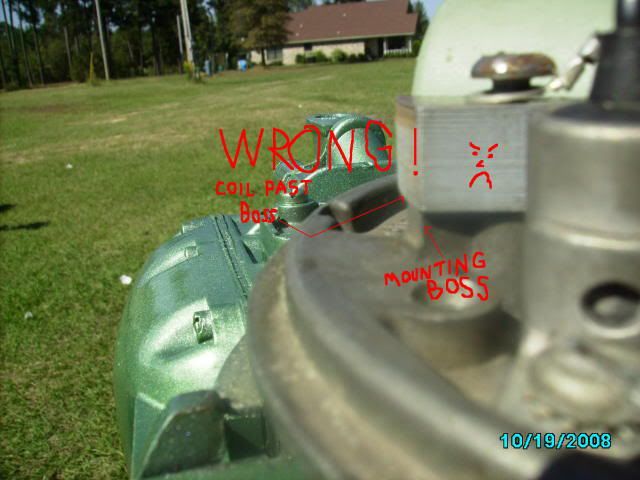
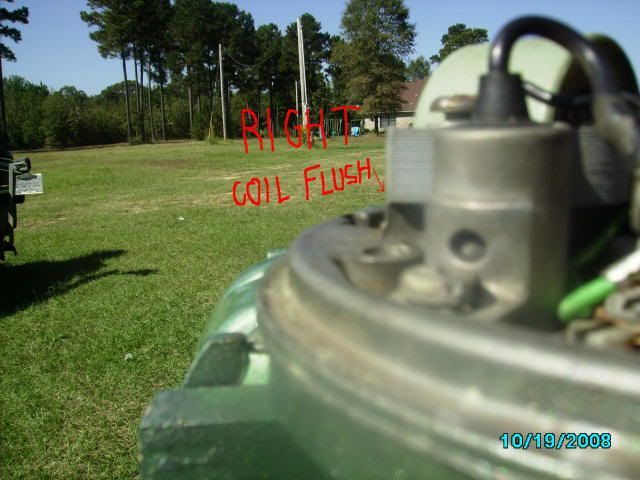
Lining up the coil heel with the mounting boss prevent damage of the coils and the flywheel magnet, prevent rubbing as the flywheel turns.
[highlight]*** Make sure the throttle is advanced to that start position***[/highlight]
Here is another picture that Garry (thanks Garry!!) supplied on another post with some modification.
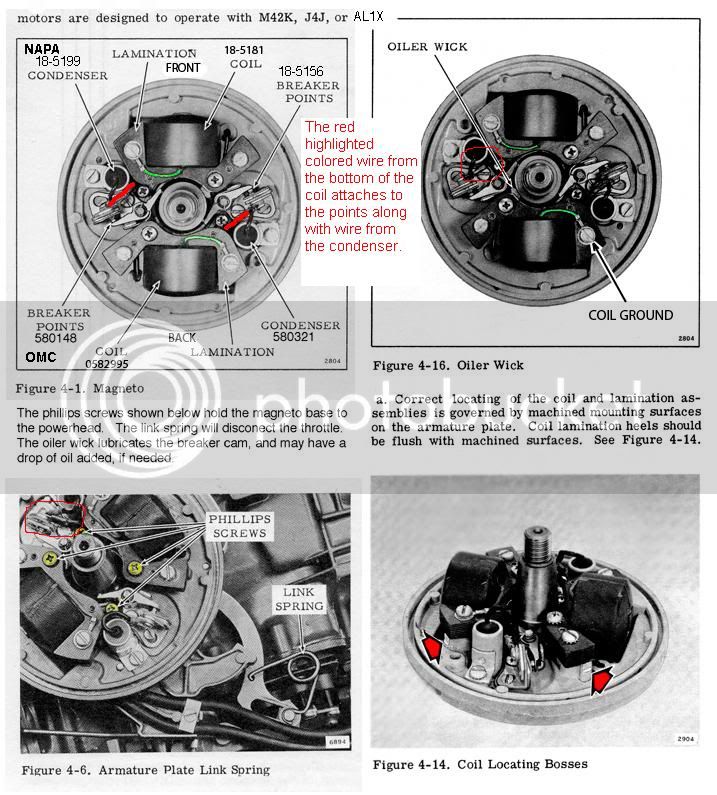
Both diagrams, should answer your questions.
Your going to need to inspect your point, condenser and coils. They are located under the flywheel. Hopefully all you need to do is clean and regap your points and you might be in business. Still check your coils and condensers and plug wires.
Here are two link to show you how to test your coils and condensers.
https://www.youtube.com/watch?v=KT8rk5QWgS0
https://www.youtube.com/watch?v=l6eSXYmENDY&feature=mfu_in_order&list=UL
Here is a diagram of a generic OMC (Johnson/Evinrudle/Gale) ignition assembly. You will have to remove the coil designated for the top cylinder and put the oil wicker in. It should be already be coated with a very light oil. (not grease). The purpose of the oil wicker is to lightly lubricate the outside riding surface of the cam so the point shoes do not prematurely wear. If you look at the points they have little shoes that ride along the cam. Please make sure the (breaker)points cam is on the correct side or the ignition will be out of timing. It should have the word [highlight]top[/highlight] machine written on the side facing up.

FYI: You can only set(gap) one set of points at a time. Put the flywheel nut back on(turn with a wrench or ratchet clockwise) to allow you turn the crankshaft. (Please remove both spark plugs to make it easier to turn the crankshaft and prevent accidental starting)
You gap the point to 0.020 when the point shoes is at the top(high point of the cam). It should have a mark along with the word top. Then you will turn clockwise to the next set of point 180 degrees and set those points the same way. You will notice that the point of the previous set will be closed and when you come around again they will open up. *** When they are open no current is allow through. This is how you set your timing with the points.***
When you go to set the point's gap. Very gently snug the anchor screw, then adjust the gap with adjusting screw and the feeler gauge until the feeler gauge is sliding through with slight resistance only. Then tighten the anchor screw. Repeat procedure with second set of points. Please make sure your hands are clean and the feeler gauge is clean, because oil on the points can foul them up and create resistance....poor or no no spark. ALways use a spark check to evaluate spark. It should jump minimum 1/4 inch. Blue sharp snappy spark.
Here is a picture of a spark check...Cheap $6

Here is a picture of how to tell which wire is going to the correct cylinder. Thanks to Garry for providing the picture on other post.

If your using the existing wires then cut about 1/4 inch of end going the coil, so you have clean un-oxidized copper contacting the spiking in the coil. Twist the end of the spark plug wire onto the coil spike. If you have replaced the wires, make sure they are 7mm copper metal core and not the automobile stuff.
***** Please make sure two things*****
1.) Make sure all the wires are tucked away under the flywheel and not rubbing up against the cam or crank, because with will eventually get damage and create a short, then no spark!!
2.) Make sure the coil heels (ends) are evenly lined up with the mounting boss.
Here are some pictures. (Compliments of JBJennings..nice fella)


Lining up the coil heel with the mounting boss prevent damage of the coils and the flywheel magnet, prevent rubbing as the flywheel turns.
[highlight]*** Make sure the throttle is advanced to that start position***[/highlight]
Here is another picture that Garry (thanks Garry!!) supplied on another post with some modification.

Both diagrams, should answer your questions.
bikeordie092
Well-known member
Thank you... that is an awesome post that I will probably print out, but I got the motor to start earlier today, next I must check the impeller to make sure it is good and I replace it if its bad. I only started it for about 5 secs today... but it runs! Woot woot! Anyone wana take a stab at what I gave for this beast?
cajuncook1
Well-known member
- Joined
- Mar 24, 2010
- Messages
- 437
- Reaction score
- 1
bikeordie092 said:Thank you... that is an awesome post that I will probably print out, but I got the motor to start earlier today, next I must check the impeller to make sure it is good and I replace it if its bad. I only started it for about 5 secs today... but it runs! Woot woot! Anyone wana take a stab at what I gave for this beast?
You traded your mother-in-law????
:LMFAO:
bikeordie092
Well-known member
cajuncook1 said:bikeordie092 said:Thank you... that is an awesome post that I will probably print out, but I got the motor to start earlier today, next I must check the impeller to make sure it is good and I replace it if its bad. I only started it for about 5 secs today... but it runs! Woot woot! Anyone wana take a stab at what I gave for this beast?
You traded your mother-in-law????
:LMFAO:
I would have had to pay alot more if I did that Lol... I gave a guy off craigslist $50 for it!
bikeordie092
Well-known member
heres a vid of the motor running, i hope to get one of it on the lake soon, the only thing i have to fix is the top spark plug is somewhat stripped, i could hear air coming out of it when i turned it by hand and tried to tighten it up but could tell its stripped, im thinking heli-coil?(spelling?) other than getting a new head, what would u guys do to fix it?
https://www.youtube.com/watch?v=yuT...DvjVQa1PpcFNva0fCRVtd_uq2nkuCzaVEZDDRIj6almU=
https://www.youtube.com/watch?v=yuT...DvjVQa1PpcFNva0fCRVtd_uq2nkuCzaVEZDDRIj6almU=
Similar threads
- Replies
- 5
- Views
- 865
- Replies
- 11
- Views
- 1K
Latest posts
-
-
-
Has anyone made a homemade OB motor lift strap to hoist motor onto boat?
- Latest: Still Afloat
-


