
Ok so I "bought" a motor and over the winter I've been tinkerings with it and have gotten it running pretty good. But only at more then idle. Full throttle is awesome, just opened up works great, but when it idled it pops and almost seems to backfire. I did a single fuel line conversion on it and I really don't think that's the problem. I know I need to get a carb kit for it and I'm hoping that works. As far as the points... I'm lost in that dept. I'm hoping its a simple fix and hoping someone has had the same issue and knows how to help me out.
TinBoats.net
The original aluminum boat site!
You are using an out of date browser. It may not display this or other websites correctly.
You should upgrade or use an alternative browser.
You should upgrade or use an alternative browser.
1959 Johnson FD13 spits and spudders while idleing... why?
- Thread starter mattf92
- Start date
Help Support TinBoats.net:
This site may earn a commission from merchant affiliate
links, including eBay, Amazon, and others.
thudpucker
Well-known member
"What I'd do!" :mrgreen:
Let it idle for awhile, pull the Plugs and see if one or both are wet.
That would tell you the Carb is letting too much fuel in.
So the Main jet is not working at idle.
The the smaller Idle jet that may be too large or the Float Bowl might be set just a tad hi, letting too much fuel through.
The Needle valve may be leaking as well. You may have too much fuel pump pressure for that old Needle valve and seat.
The Points (under the Flywheel) have something to do with timing. That will cause Spitting as well.
I wish you luck. I have an old 5.5 Evinrude I want to convert. So stick with me, as I may need your help! =D>
Ok that sounds about right as far as too much fuel. All the carb parts are original so hopefully the new carb kit and a bitof playing with the float will solve the problem.
Ok... As far as the single fuel line conversion goes.... It was very simple but nerve racking as I was drilling and tapping one ot the cast aluminum side plates. I tried uploading a pic but it won't let me so... You can email me @ [email protected] and I can get you pix that way. But from tapping one of the holes out on the side plate I ran fuel line to a vacuume/pressure style fuel that they used in the 1960s when single fuel lines were starting to come around. From what I hear you can find these even on lawn tractors made by john deer and Briggs and Stratton. From the pump I have the fuel in and fuel out lines with an inline fuel filter. I read many articals and forum posts about it and watched many YouTube videos on it as well. I found this way to be the most simple and least likely to f up the motor if something went wrong.
Ok... As far as the single fuel line conversion goes.... It was very simple but nerve racking as I was drilling and tapping one ot the cast aluminum side plates. I tried uploading a pic but it won't let me so... You can email me @ [email protected] and I can get you pix that way. But from tapping one of the holes out on the side plate I ran fuel line to a vacuume/pressure style fuel that they used in the 1960s when single fuel lines were starting to come around. From what I hear you can find these even on lawn tractors made by john deer and Briggs and Stratton. From the pump I have the fuel in and fuel out lines with an inline fuel filter. I read many articals and forum posts about it and watched many YouTube videos on it as well. I found this way to be the most simple and least likely to f up the motor if something went wrong.
JMichael
Well-known member
I'm not familiar with that motor but if it runs great at full throttle but sputters at low rpm and idle, the first thing I'd look at would be the idle jet for any sort of blockage.
- Joined
- May 15, 2010
- Messages
- 3,667
- Reaction score
- 325
- Location
- Central Florida
- LOCATION
- Lake County, Central Florida
First off.....on that engine there is no idle jet.
Second, a "backfire" is normally an indication of a lean condition, not a rich condition.
There is a mixture screw controlling mixed air and fuel through a passage to the top of the carburetor. If you have two mixture screws this is the one on top.
The mixture screw should have resistance to turning which indicates the packings are properly adjusted. If not then turn the 7/16" nut that surrounds the idle needle clockwise a little until you feel resistance. This will assure no air is being introduced at that point.
Back out the idle screw to 1 1/2 turns from a LIGHTLY closed position and start the engine at idle. Make sure you have water in your tank well up the side of the exhaust housing. If the engine runs normally but rich at that setting then turn in 1/8 turn at a time until the engine starts to run cleaner and crisper. When you have gone to far the engine will start to lose RPM and probably backfire or spit back. At that point reverse the needle to the highest RPM and go around another 1/8 to 1/4 turn.
Thanks Pappy. That all sounds like what I've tried to do but I'm going to have to get a carb kit that way the felt packing will block the air getting in. Somewhere in the carb its doing something funny. So ill get the kit and set the needles like you and the manual says and I.guess ill go from there.
thudpucker
Well-known member
Pappy's good! ")
I have a little experience to go along with Pappy's logic.
Take that Idle (low speed jet) out and look at the pointed end for damage.
Some folks just cannot resist cruelly torquing those screws down which damages the point.
When that happens, the flow across the point is disrupted. A tiny bit of turn can make a Huge difference in the fuel/air flow.
What ever you do, DONT [-X mess with the seat the small point fits into.
If that seat is messed up, you need a new needle & seat if you can get it.
That Seat angle etc is specifically formed. Not something you can do by hand.
thudpucker
Well-known member
Things like this are so intriguing. Makes me wish I was closer so I could help out.
- Joined
- May 15, 2010
- Messages
- 3,667
- Reaction score
- 325
- Location
- Central Florida
- LOCATION
- Lake County, Central Florida
If you have done all of this and it is still lean spitting at idle you may have either an upper seal or a lower seal on the crankshaft that has or is in the process of failing. Do you see alot of black oily residue coming from under the flywheel area?
Rebuilding the carb would be the first place to go so you are hopefully on the right track. Make sure you pull the core plug on the top of the carb when you clean it. Under that core plug are the tiny calibration holes that make that engine idle. Always possible one is plugged or partially plugged and not allowing you to get a nood needle set on the engine. Carefully drill the core plug with a 1/8" drill bit. Do not allow that bit to go screaming down and hit the bottom of the carb when it goes through the plug. Pry out the plug once you have made the hole.
Rebuilding the carb would be the first place to go so you are hopefully on the right track. Make sure you pull the core plug on the top of the carb when you clean it. Under that core plug are the tiny calibration holes that make that engine idle. Always possible one is plugged or partially plugged and not allowing you to get a nood needle set on the engine. Carefully drill the core plug with a 1/8" drill bit. Do not allow that bit to go screaming down and hit the bottom of the carb when it goes through the plug. Pry out the plug once you have made the hole.
thudpucker
Well-known member
Pappy, would soaking the Carb in Berrymans Chem-tool get those little holes clean without pulling that soft plug?
mattf92 said:Ok.... What do I use to plug the hole back up with? I haven't gotten the kit yet and I'm not sure the kit comes with a new plug.
You will need a new plug once you get that one out. They are very cheap. Make sure the new plug is air tight once you tap it back on. I put a little finger nail polish around it.
- Joined
- May 15, 2010
- Messages
- 3,667
- Reaction score
- 325
- Location
- Central Florida
- LOCATION
- Lake County, Central Florida
Good Lord People! If you don't know the answers just sit back and learn rather than leading the OP down an errant path.
The OEM kit has the proper core plug in the kit already. Do not by-pass this step....not with the issues you are describing.
The OEM kit has the proper core plug in the kit already. Do not by-pass this step....not with the issues you are describing.
Pappy said:Good Lord People! If you don't know the answers just sit back and learn rather than leading the OP down an errant path.
The OEM kit has the proper core plug in the kit already. Do not by-pass this step....not with the issues you are describing.
If this is aimed at me, I was merely pointing out that he will not be able to use the same plug once he puts a drill bit through it.
cajuncook1
Well-known member
- Joined
- Mar 24, 2010
- Messages
- 437
- Reaction score
- 1
I am not going to sway you from Pappy's instructions, because he knows what he is talking about. (His background more than certifies him!!) All I am going to do is provide some diagrams and stuff to visually assist. I made this up for a member about 2 years ago and most of it applies to your situation.
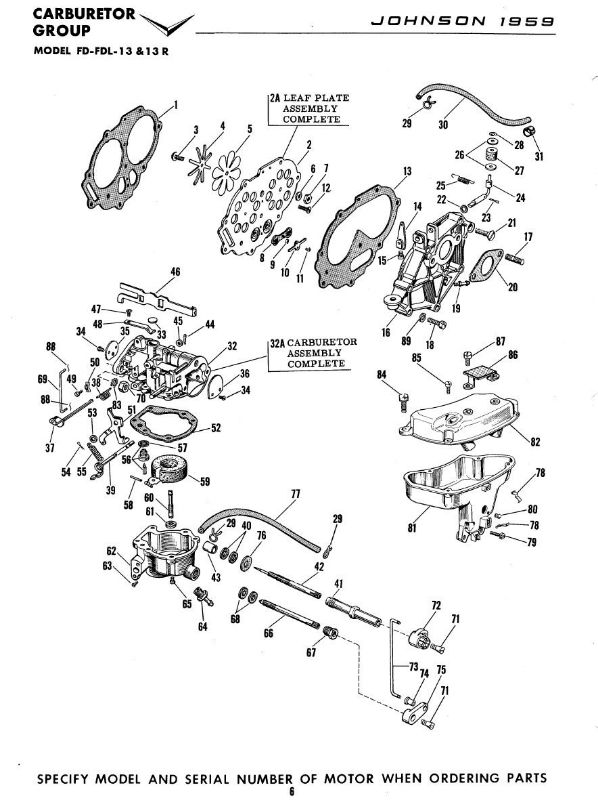
Couple of suggestions about your carburetor. Here is a diagram to reference to:
- Please get a carburetor kit and do a proper job, so you know that it has been done and correctly.
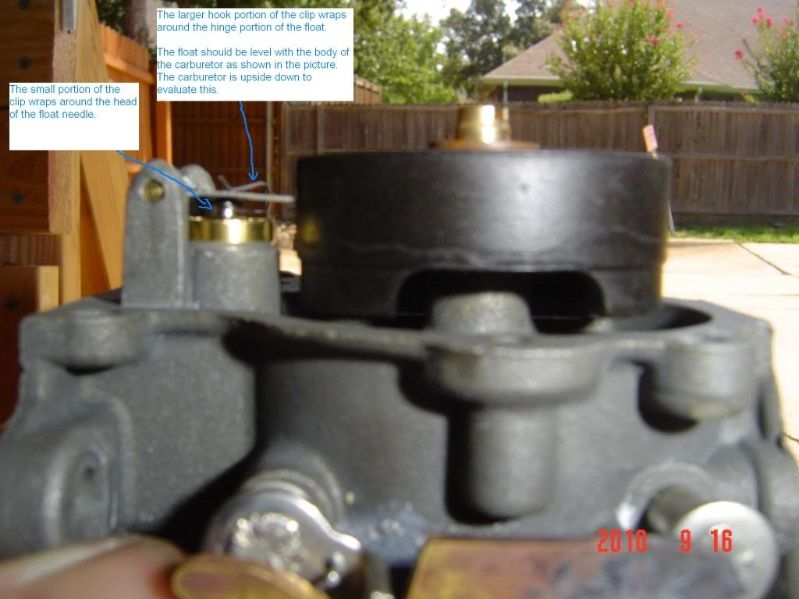
***Please note: Parts numbers 20,33,40,43,52,56,57,59,61, and 68 (59 if you do not have alcohol resistant float). [/U](All these parts get changed with a carburetor rebuild and are found in a new carb kit)[/U]. With the new carburetor kit they have a little hinge pin to keep the float needle (#56) from get stuck. See the carb picture at the bottom of this post.
- Look at part diagram... part #33 (core plug), it need to be removed, clean and replace with a new plug.
The only way to properly clean the carburetor is to remove part#33 (core plug) and make sure it does not have junk in there. This can affect your engine running and idling at low speeds. *** Also removed the old slow needle valve packing (parts number 40 and 68 in the diagram) and replace with the one the come in the new kit.
- After the core/expansion plug (item #33) is removed, make sure that the mixing chamber is free of trash or slug and the three little holes at it's base is clear and clean. (This step is the one people forget or don't think about and it bites you in the butt sometimes.)
- Blow all the passages with compressed air after the carburetor dip?
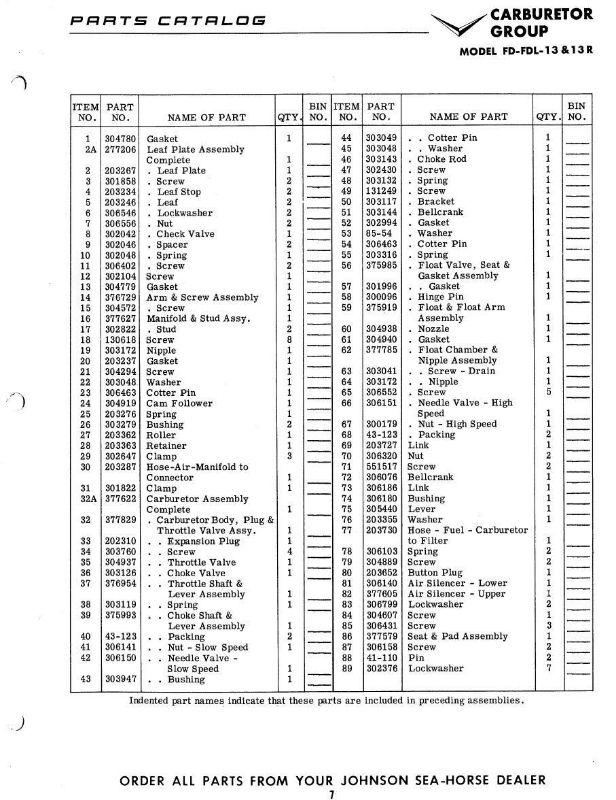
Here is a procedure for removing the expansion/core plug for cleaning.
Nonremoval of that core or expansion plug to do a complete carburetor cleaning is probably the one issue that plagues a lot of us. It is also a source of frustration because the trash and goo that is in that pocket can't always be cleaned with carb clean or blown out. In the future if when you get a carburetor kit and do a complete carburetor cleaning, always remove the core or expansion plug and replace with a new plug.
I am going to supply some diagrams for better explanation.
Be very careful if you put the carburetor body in a vise, so you don't damage the linkages or body with the vise.
You can use a punch or a drill to [highlight]carefully[/highlight] puncture a hole so you can remove the core plug. I have used a machine screw to puncture the core plug and used a pair of piers grasp the screw head and pop the core plug out, but be very careful not to go too deep with the drill, punch or screw. You don't want damage the chamber.
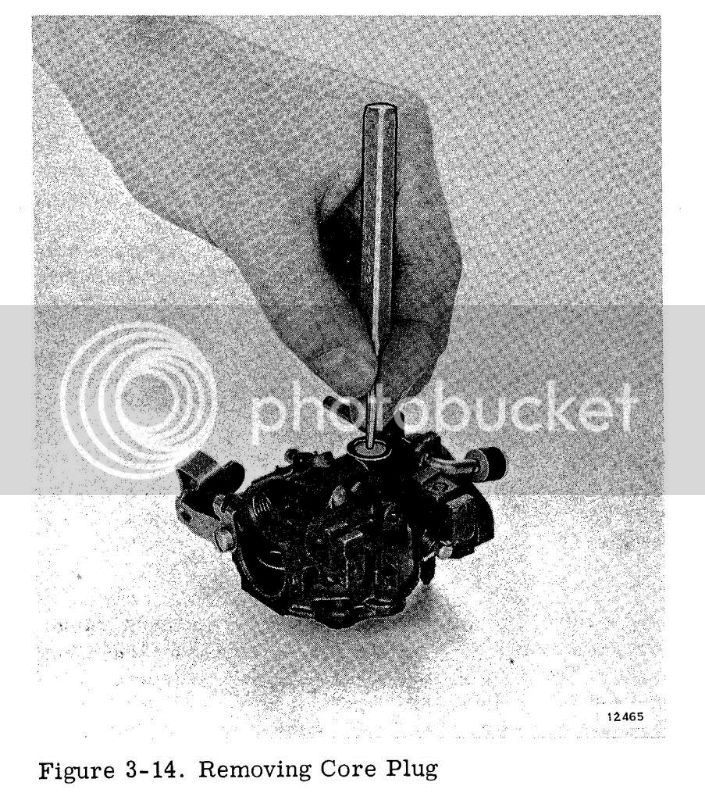
Once you have carefully cleaned the chamber, the little holes at the bottom and the needle passage to the mixing chamber then apply the core plug with the convext side up (the rounded side facing the sky).
[highlight]Try not to use wire to scrub out the holes or the needle passage way to the mixing chamber are you could damage or widen the hole and cause mixing problems. Spray carb cleaner or compressed air.[/highlight]
If you do not have a air compressor, then walmart sells compressed air cans with the straws that can be used. $3 or $4 dollars(you have seen the cans of compressed air that we use to clean are computer keyboards and equipment).[highlight]Also remember to disassemble your carb of all plastic and gaskets prior to using carburetor cleaner or dip( that stuff eats gaskets and plastic)[/highlight]. Blow it all out with compressed air.
Then take a wide punch or a 3/8 or 1/2 extension from a socket set (it has a wide flat base) and carefully tap(with a hammer and wide punch or extension piece) the core plug replacement in place. The convex (rounded portion) should be somewhat flat when done.
Well, that's how I do it, maybe someone will have other methods.
[highlight]Make sure these are your beginning carburetor settings:[/highlight]
These are going to be the initial settings for the carburetor for starting purposes. Your will later fine tune the settings.
Facing the carburetor you will notice (top) slow speed/idle knob and the (bottom) high speed needle and knob
- Top needle is your slow idle needle. You will gently turn in (clockwise) until the needle is gently seated..please don't force. Once seated, you will turn out (counter clockwise) the slow idle needle 1 1/2 turns. Leave it there for the time being.
- Bottom needle is your high speed needle. You will gently turn in (clockwise) until the needle is gently seated..please don't force. Once seated, you will turn out (counter clockwise) the slow idle needle 1 turn. Leave it there for the time being.
Couple of things you can try if you are still having some running or idling issues after you completed your carburetor cleaning and kit.
1.) Make sure the fuel cap air vent is open. If closed it will not allow the fuel to flow properly from the tank.
2.) Make sure you have fresh mix of gas 87 octane and twc-3 2cycle oil mixed at a ratio of 24:1. Old fuel mix in tank can accumulate water and cause very poor running indeed.
I hope this helps you out. There is a description how to properly set your float for your carburetor, but I will included a picture just in case.
Couple of suggestions about your carburetor. Here is a diagram to reference to:
- Please get a carburetor kit and do a proper job, so you know that it has been done and correctly.
***Please note: Parts numbers 20,33,40,43,52,56,57,59,61, and 68 (59 if you do not have alcohol resistant float). [/U](All these parts get changed with a carburetor rebuild and are found in a new carb kit)[/U]. With the new carburetor kit they have a little hinge pin to keep the float needle (#56) from get stuck. See the carb picture at the bottom of this post.
- Look at part diagram... part #33 (core plug), it need to be removed, clean and replace with a new plug.
The only way to properly clean the carburetor is to remove part#33 (core plug) and make sure it does not have junk in there. This can affect your engine running and idling at low speeds. *** Also removed the old slow needle valve packing (parts number 40 and 68 in the diagram) and replace with the one the come in the new kit.
- After the core/expansion plug (item #33) is removed, make sure that the mixing chamber is free of trash or slug and the three little holes at it's base is clear and clean. (This step is the one people forget or don't think about and it bites you in the butt sometimes.)
- Blow all the passages with compressed air after the carburetor dip?
Here is a procedure for removing the expansion/core plug for cleaning.
Nonremoval of that core or expansion plug to do a complete carburetor cleaning is probably the one issue that plagues a lot of us. It is also a source of frustration because the trash and goo that is in that pocket can't always be cleaned with carb clean or blown out. In the future if when you get a carburetor kit and do a complete carburetor cleaning, always remove the core or expansion plug and replace with a new plug.
I am going to supply some diagrams for better explanation.
Be very careful if you put the carburetor body in a vise, so you don't damage the linkages or body with the vise.
You can use a punch or a drill to [highlight]carefully[/highlight] puncture a hole so you can remove the core plug. I have used a machine screw to puncture the core plug and used a pair of piers grasp the screw head and pop the core plug out, but be very careful not to go too deep with the drill, punch or screw. You don't want damage the chamber.
Once you have carefully cleaned the chamber, the little holes at the bottom and the needle passage to the mixing chamber then apply the core plug with the convext side up (the rounded side facing the sky).
[highlight]Try not to use wire to scrub out the holes or the needle passage way to the mixing chamber are you could damage or widen the hole and cause mixing problems. Spray carb cleaner or compressed air.[/highlight]
If you do not have a air compressor, then walmart sells compressed air cans with the straws that can be used. $3 or $4 dollars(you have seen the cans of compressed air that we use to clean are computer keyboards and equipment).[highlight]Also remember to disassemble your carb of all plastic and gaskets prior to using carburetor cleaner or dip( that stuff eats gaskets and plastic)[/highlight]. Blow it all out with compressed air.
Then take a wide punch or a 3/8 or 1/2 extension from a socket set (it has a wide flat base) and carefully tap(with a hammer and wide punch or extension piece) the core plug replacement in place. The convex (rounded portion) should be somewhat flat when done.
Well, that's how I do it, maybe someone will have other methods.
[highlight]Make sure these are your beginning carburetor settings:[/highlight]
These are going to be the initial settings for the carburetor for starting purposes. Your will later fine tune the settings.
Facing the carburetor you will notice (top) slow speed/idle knob and the (bottom) high speed needle and knob
- Top needle is your slow idle needle. You will gently turn in (clockwise) until the needle is gently seated..please don't force. Once seated, you will turn out (counter clockwise) the slow idle needle 1 1/2 turns. Leave it there for the time being.
- Bottom needle is your high speed needle. You will gently turn in (clockwise) until the needle is gently seated..please don't force. Once seated, you will turn out (counter clockwise) the slow idle needle 1 turn. Leave it there for the time being.
(Carburetor Adjustments - Two Adjustable N/Vs)
(J. Reeves)
Initial settings are: Bottom high speed = seat gently (turn needle clockwise), then open 1 turn out(counter clockwise). Top slow speed = seat gently(turn needle clockwise), then open 1-1/2 turns out (counter clockwise.
Once you have adjusted the idle/slow speed needle and the high speed needles, then snug up/ tighten part numbers 41 and 68 with 7/16 open in wrench enough to feel resistance when you turn the needles, but not too much where it makes it very difficult to turn the needles by hand.
Setting the high and low needle valves properly:
NOTE: These settings should be done a large test barrel or on the boat in the water/lake!! It best to do these adjustment on the boat in the lake or on commercial size test tank. (You can damage your motor running it wide open in a small test barrel.)
(High Speed) Start engine (it will run pretty rough), shift into forward gear, take up to full throttle. In segments of 1/8 turn in (clockwise), waiting for the engine to respond between turns, start turning in the bottom high speed needle valve. You'll reach a point whereas the engine will either start to die out or spit back (sounds like a mild backfire). At that point, back out (counter clockwise) the needle valve 1/4 turn. Within that 1/4 turn, you'll find the smoothest setting.
(Low Speed) Slow the engine down to where it just stays running. Shift into neutral. Again in segments of 1/8 turn in (clockwise), start to turn the top needle valve in. Wait a few seconds for the engine to respond. As you turn the valve in, the rpms will increase. Lower the rpms again to where the engine will just stay running. Eventually you'll hit the point where the engine wants to die out or it will spit back. Again, at that point, back out the valve 1/4 turn (counter clockwise). Within that 1/4 turn, you'll find the smoothest slow speed setting.
When you have finished the above adjustments, you will have no reason to move them again unless the carburetor fouls/gums up from sitting, in which case you would be required to remove, clean, and rebuild the carburetor anyway.
Couple of things you can try if you are still having some running or idling issues after you completed your carburetor cleaning and kit.
1.) Make sure the fuel cap air vent is open. If closed it will not allow the fuel to flow properly from the tank.
2.) Make sure you have fresh mix of gas 87 octane and twc-3 2cycle oil mixed at a ratio of 24:1. Old fuel mix in tank can accumulate water and cause very poor running indeed.
I hope this helps you out. There is a description how to properly set your float for your carburetor, but I will included a picture just in case.