onthewater102
Well-known member
This is a start to finish post luckily. Hope this helps someone else with a similar issue.
THE ISSUE:
Problems started at the end of last year where my motor wouldn't hold idle & would die out if I didn't race the engine. If I could keep it going and get it into gear I could run it with a decent amount of throttle but could not slow down & crawl along without it dying.
First thing I ruled out was a spark issue. That is easy to do with an inline spark indicator, and well worth the $10 they cost to anyone looking to maintain their own motor. I pulled the plugs just to check them & they looked fine, not all coated over in carbon or corroded away etc. Without a spark issue I could for the moment rule out ignition coils, stator, trigger & the switch box - all of the costly possibilities.
PHEW...fuel issue...much cheaper fix (hopefully.)
So I checked the gas delivery to the carb first - primer bulb was solid and as I have clear fuel lines on the motor I'm able to see there was always plenty of fuel getting to the carb - no reason it shouldn't start there. Cleaned the fuel filter for good measure, nothing in there that would be obstructing fuel flow and no indication of water mixing in the gas. All good so far - next up is the carb.
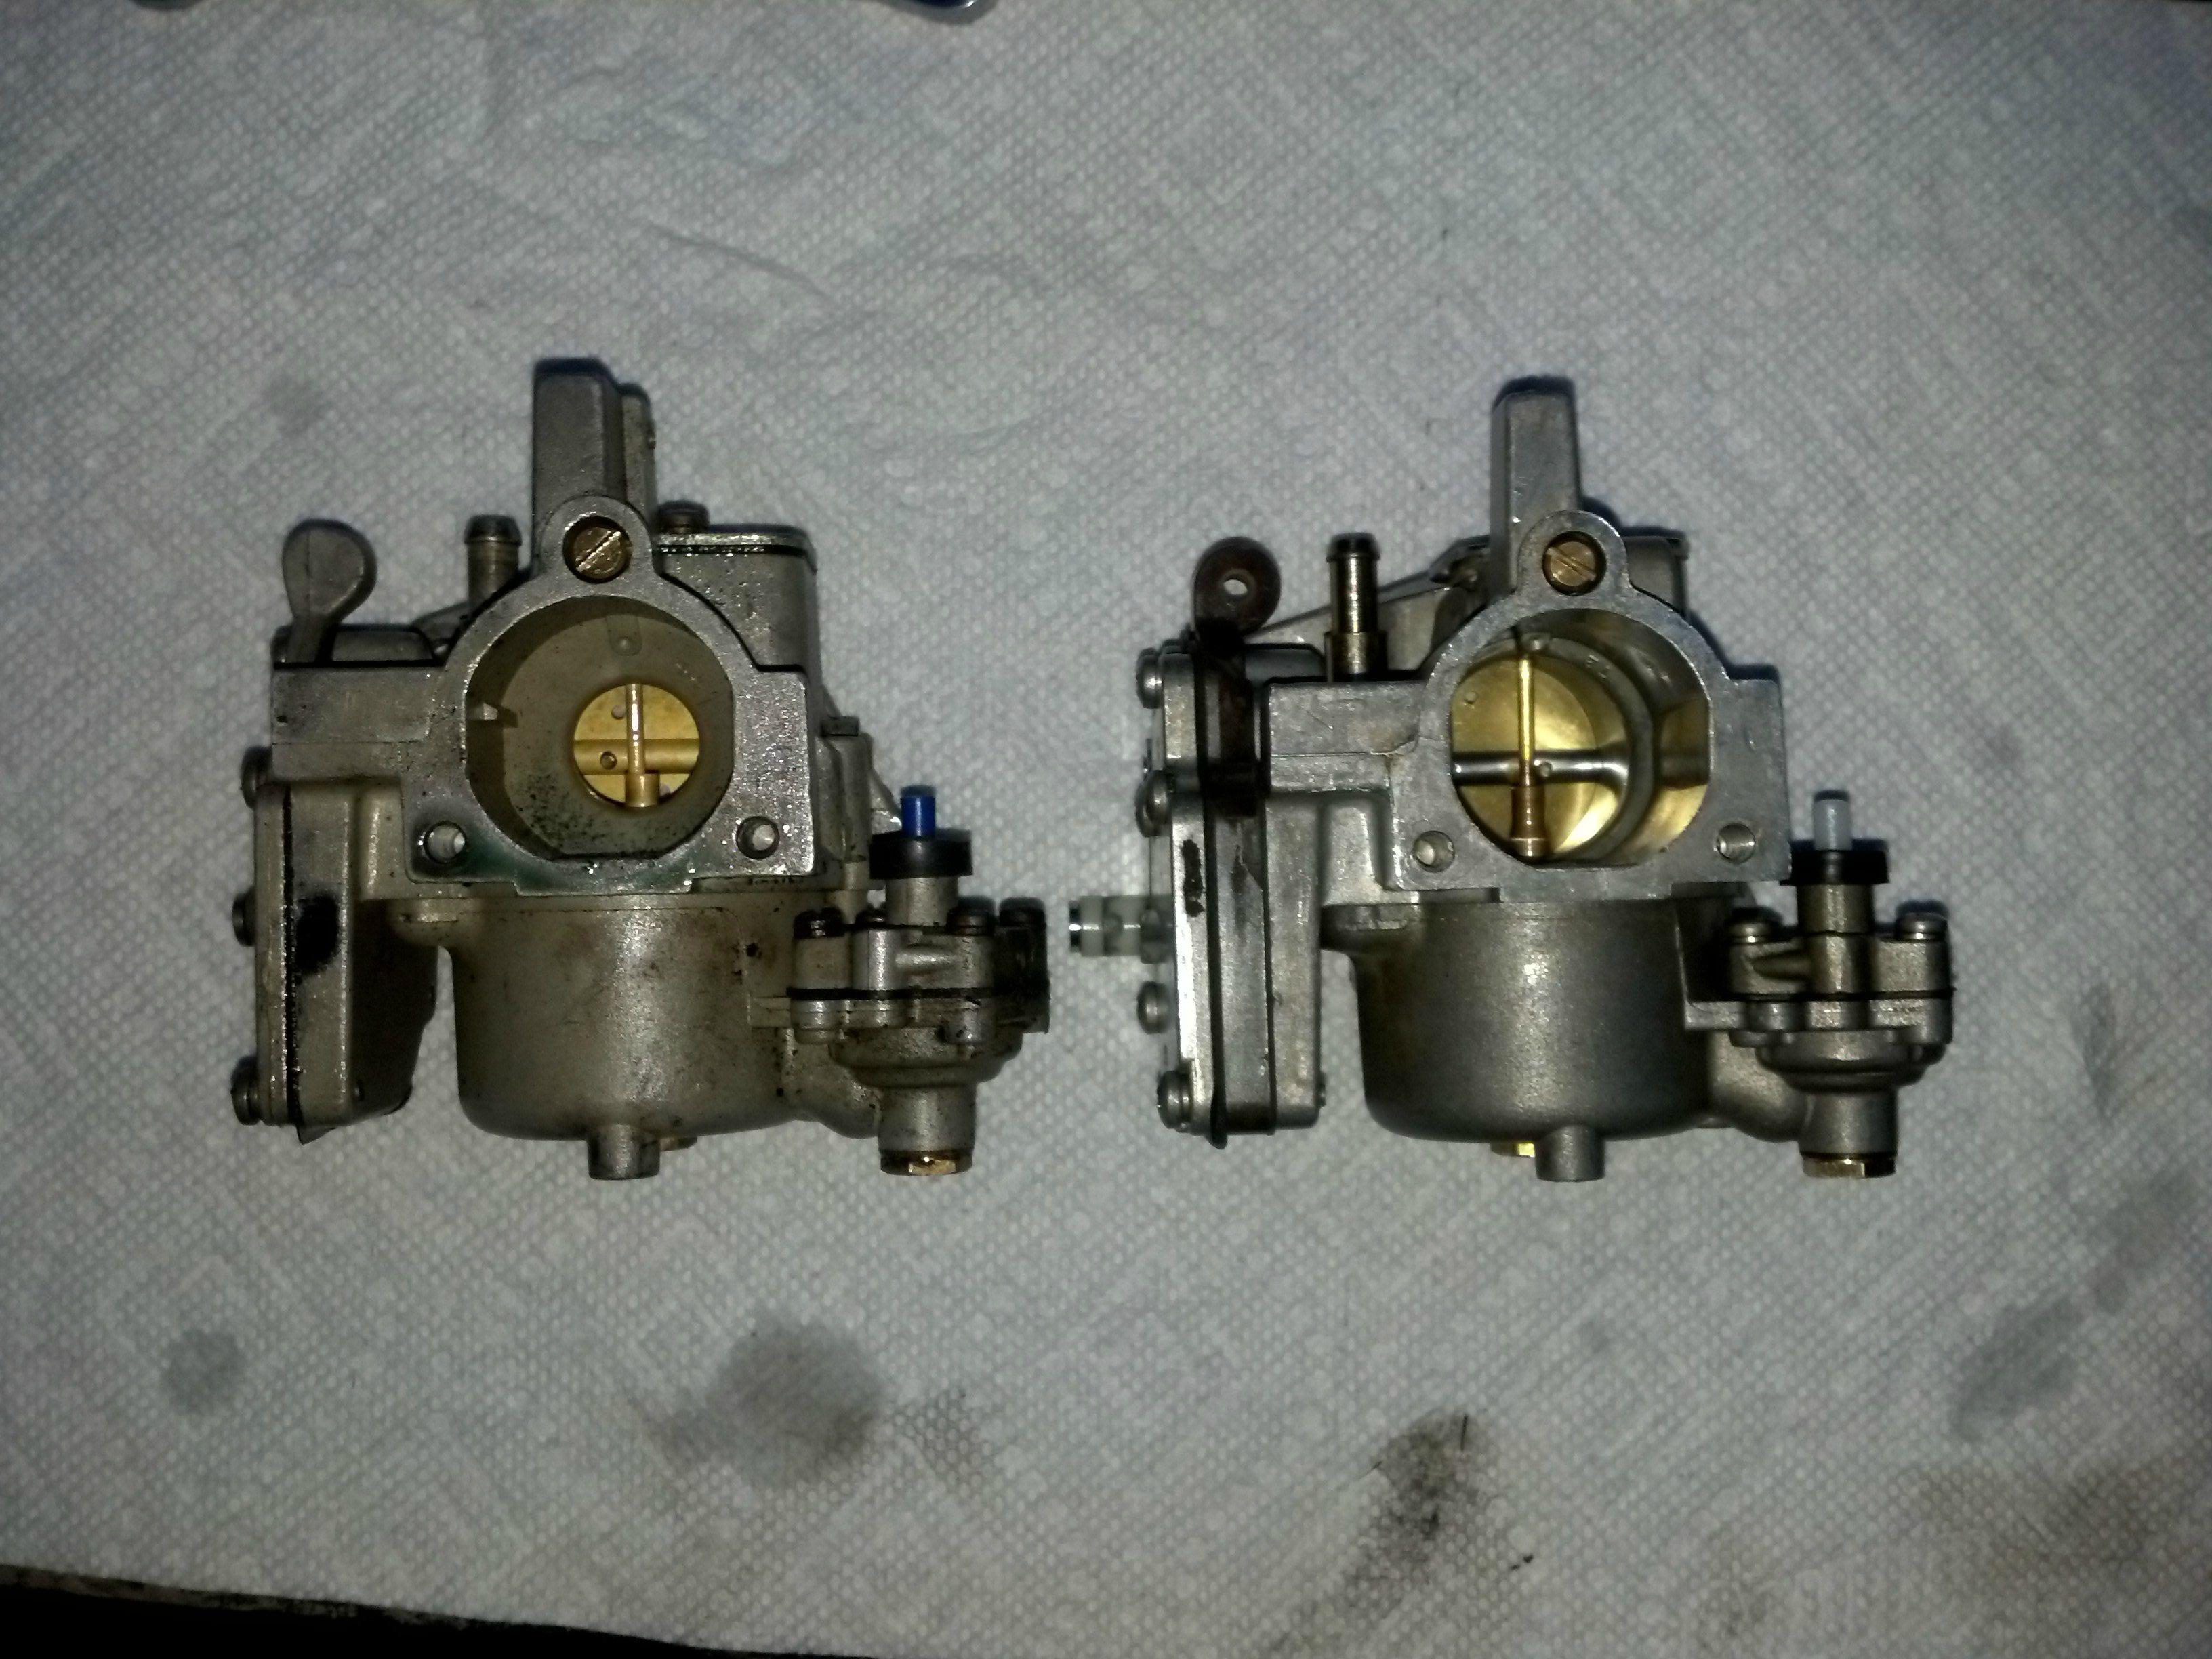
Bit of history on the motor - I swapped the carbs on the motor to up the power from 20hp to 25hp (this is the only difference between the two power variants of these motors, I checked every part number on two motors of the same vintage) but I did not rebuild the 25hp carb at the time I made the switch. It hasn't given me any issues in several years of running it so I suspected the ethanol may finally have gotten to it. These carbs use a rubber diaphragm to use pulses of vacuum from the motor to pump fuel into the carb, so this was a likely suspect.
So I cleaned rebuilt the carb with new gaskets. I snaked all the lines and passages with thin gauge mono-filament and blew everything out on my air compressor to make sure all passages were open & free in both directions. There was no wear or deformation of the rubber tip on the inlet needle valve operated by the float, something that ethanol commonly wrecks. Other common areas are the fuel pump diaphragm and the diaphragm on the enrichment valve, both of which had noticeable cracking, so I thought I'd found my gremlin. Put the carb back together with the new gaskets and diaphragms and tried starting it up again, but the issue persisted.
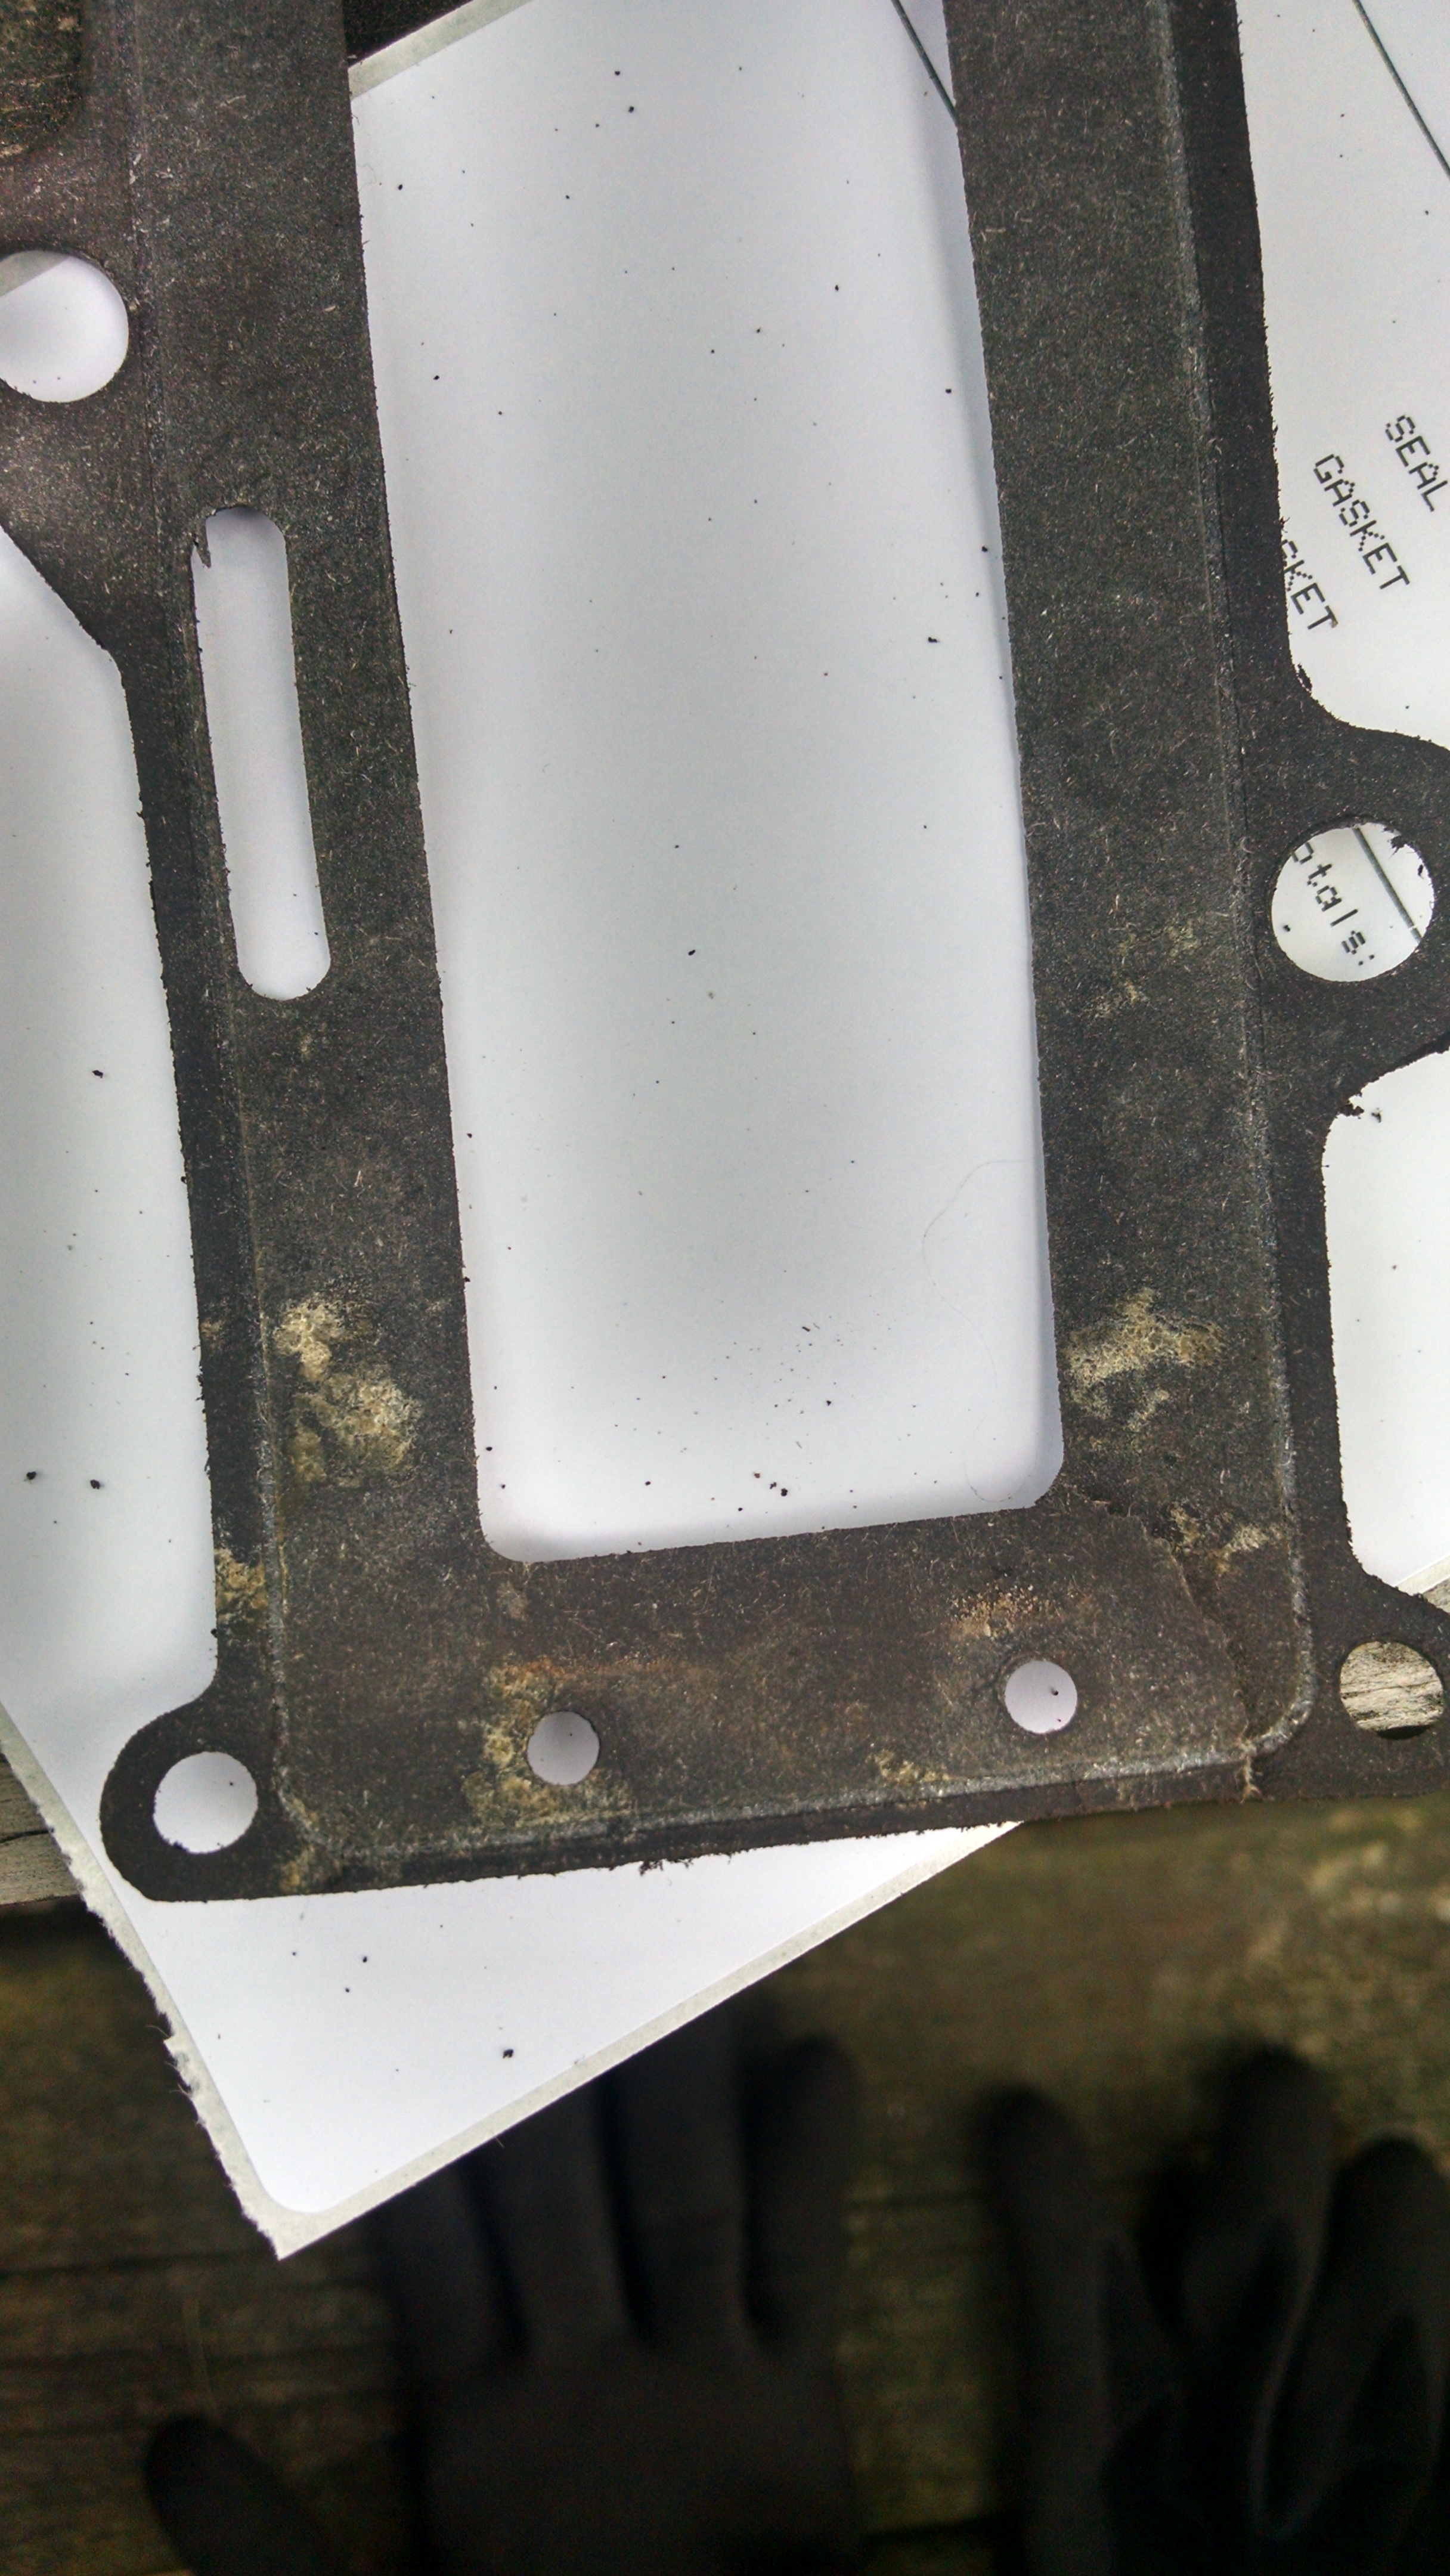
Now I'm looking for a vacuum leak that would be robbing my carb of the vacuum it needs to function because clearly it has fuel to the carb and spark, and there is no obstruction in the carb itself or issue within the carb that should prevent it from operating. Inspected both vacuum lines, each was flexible and showed no sign of damage, so I dismissed them as possible problems. Next deeper component was the reed block assembly. I pulled this out and started to find more issues. The gasket between the reed block and the cover plate showed no signs of air intrusion, but it had what looked to be pollen deposits on the flat face of the gasket (the tears were when I removed the gasket and were not there prior to me pulling it all apart as best I could tell:
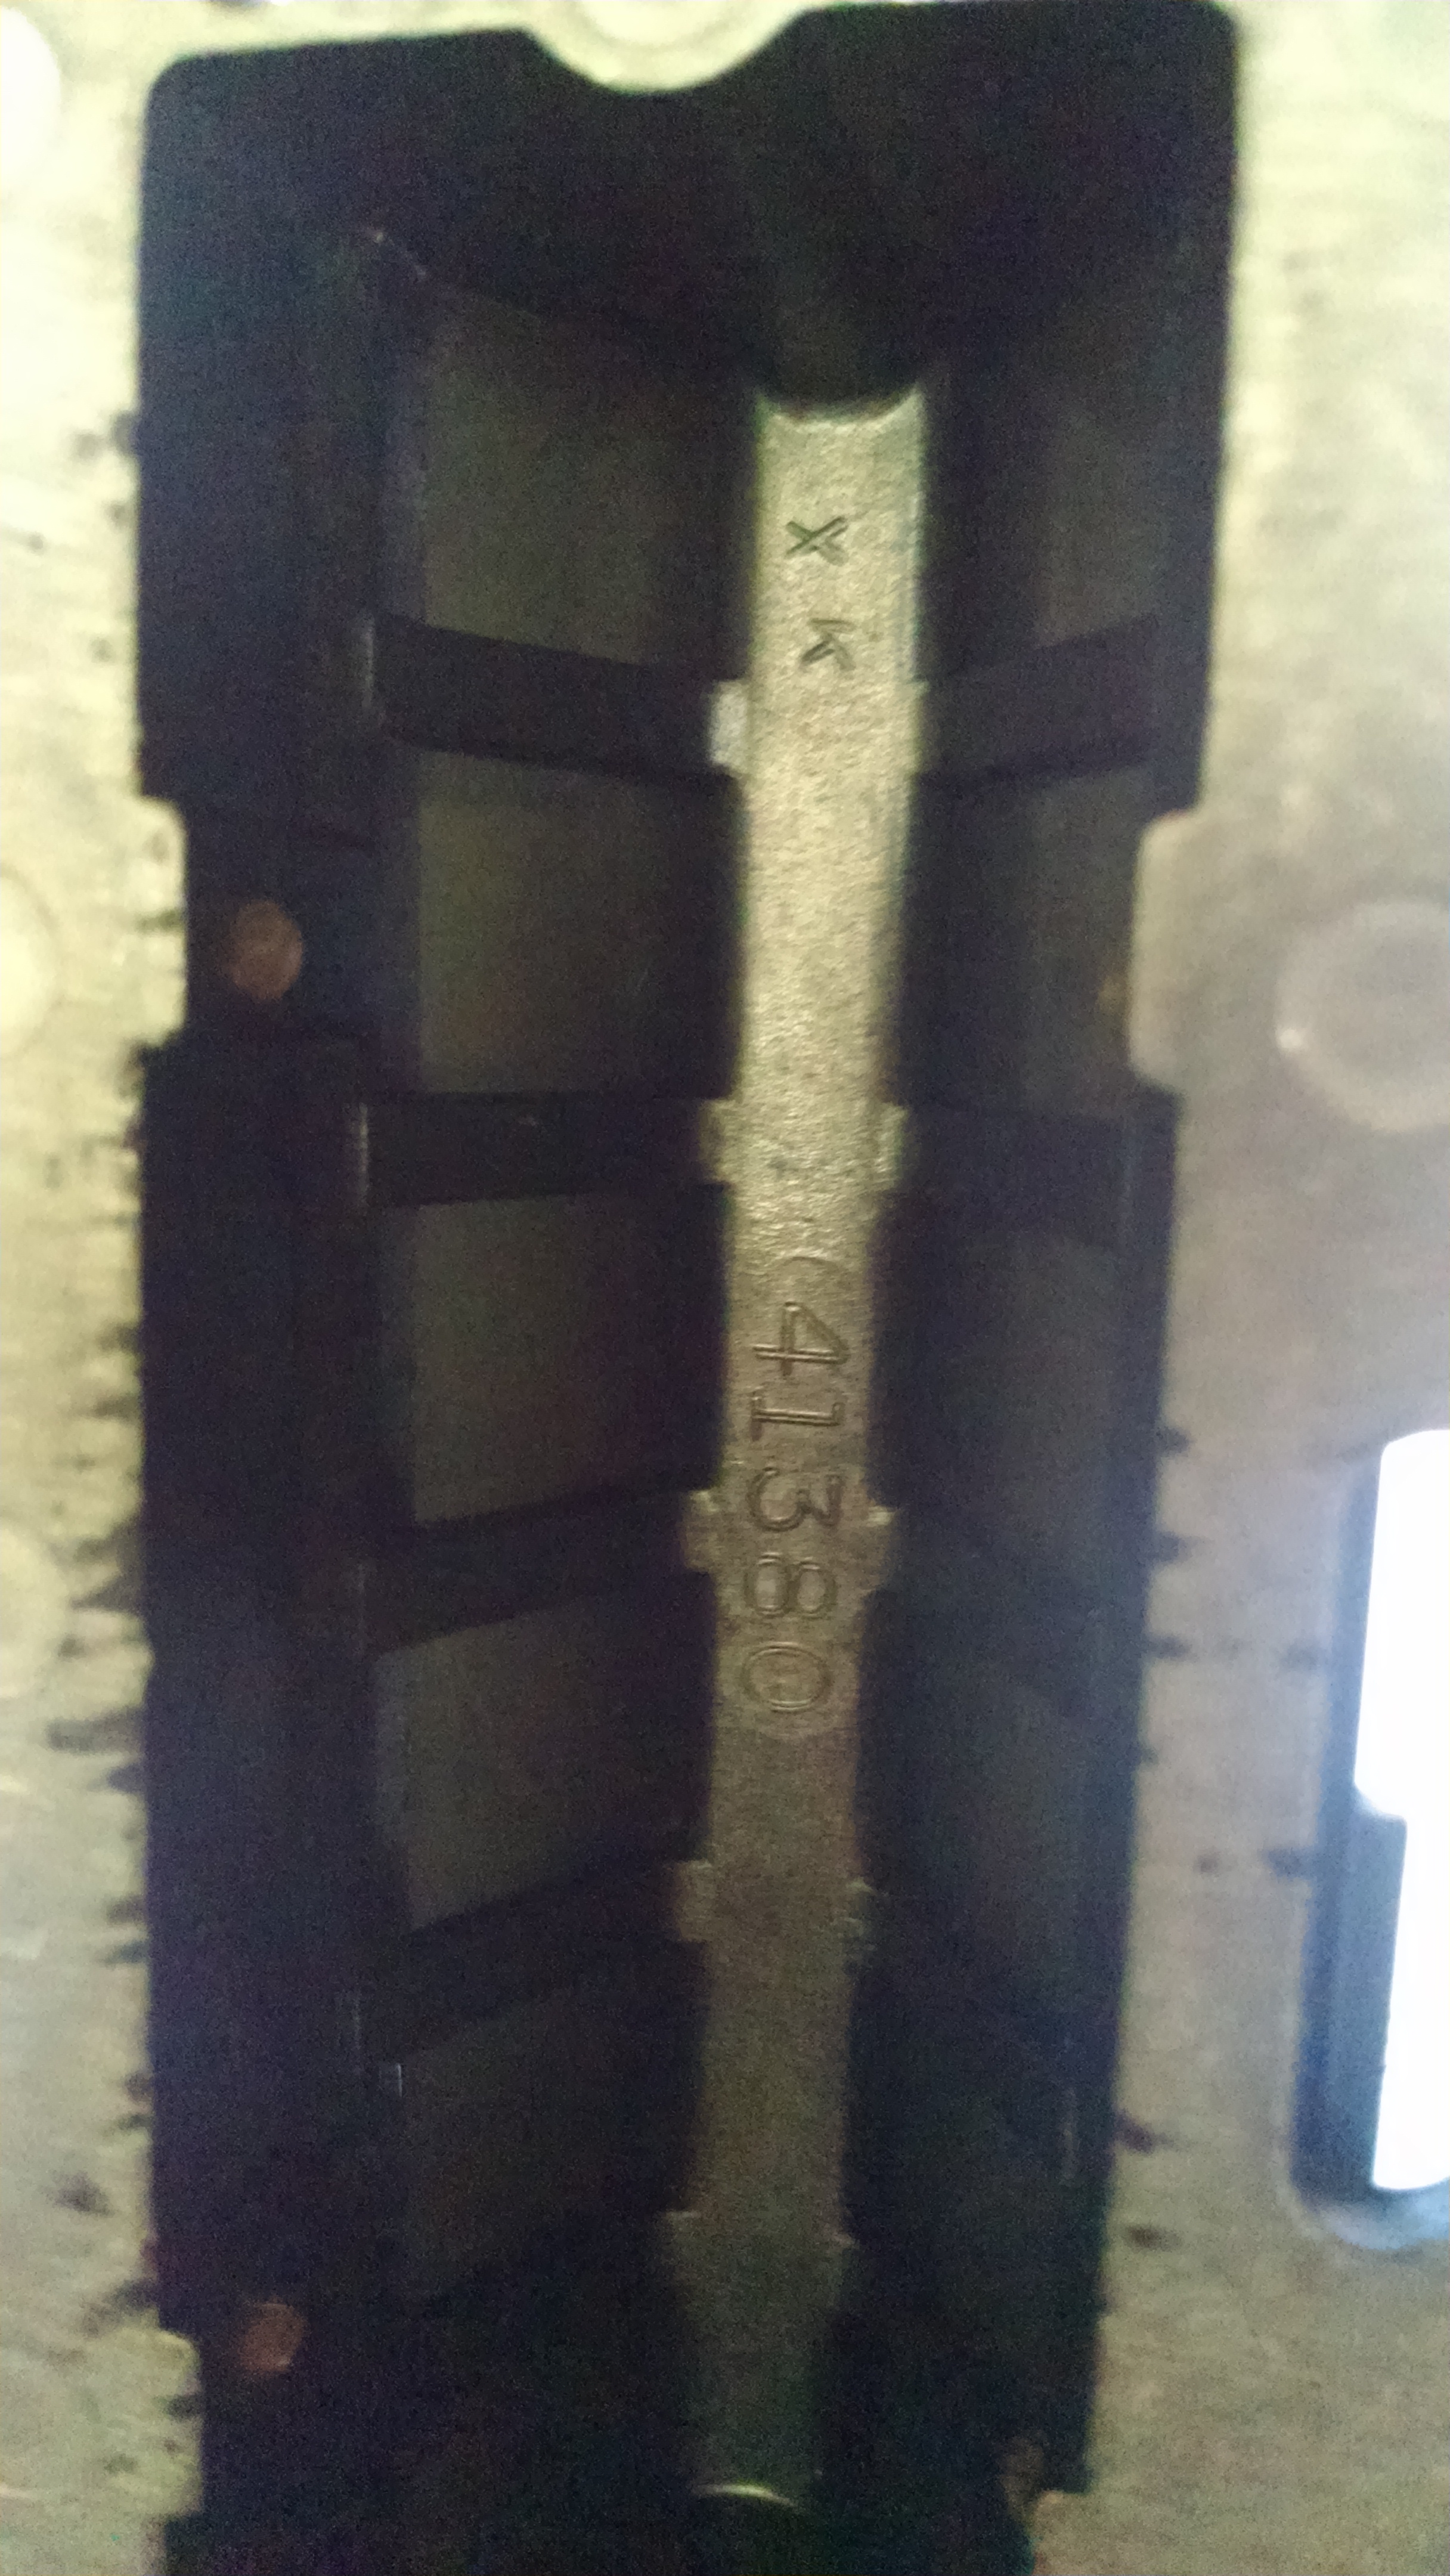
No biggie, I ordered gaskets prior to taking this all apart as I figured after 30 years it was probably not going to survive being pulled apart anyway. I took the reed block and held it up to see if the reeds were fully closed as they should be and found this on both sides of the block:
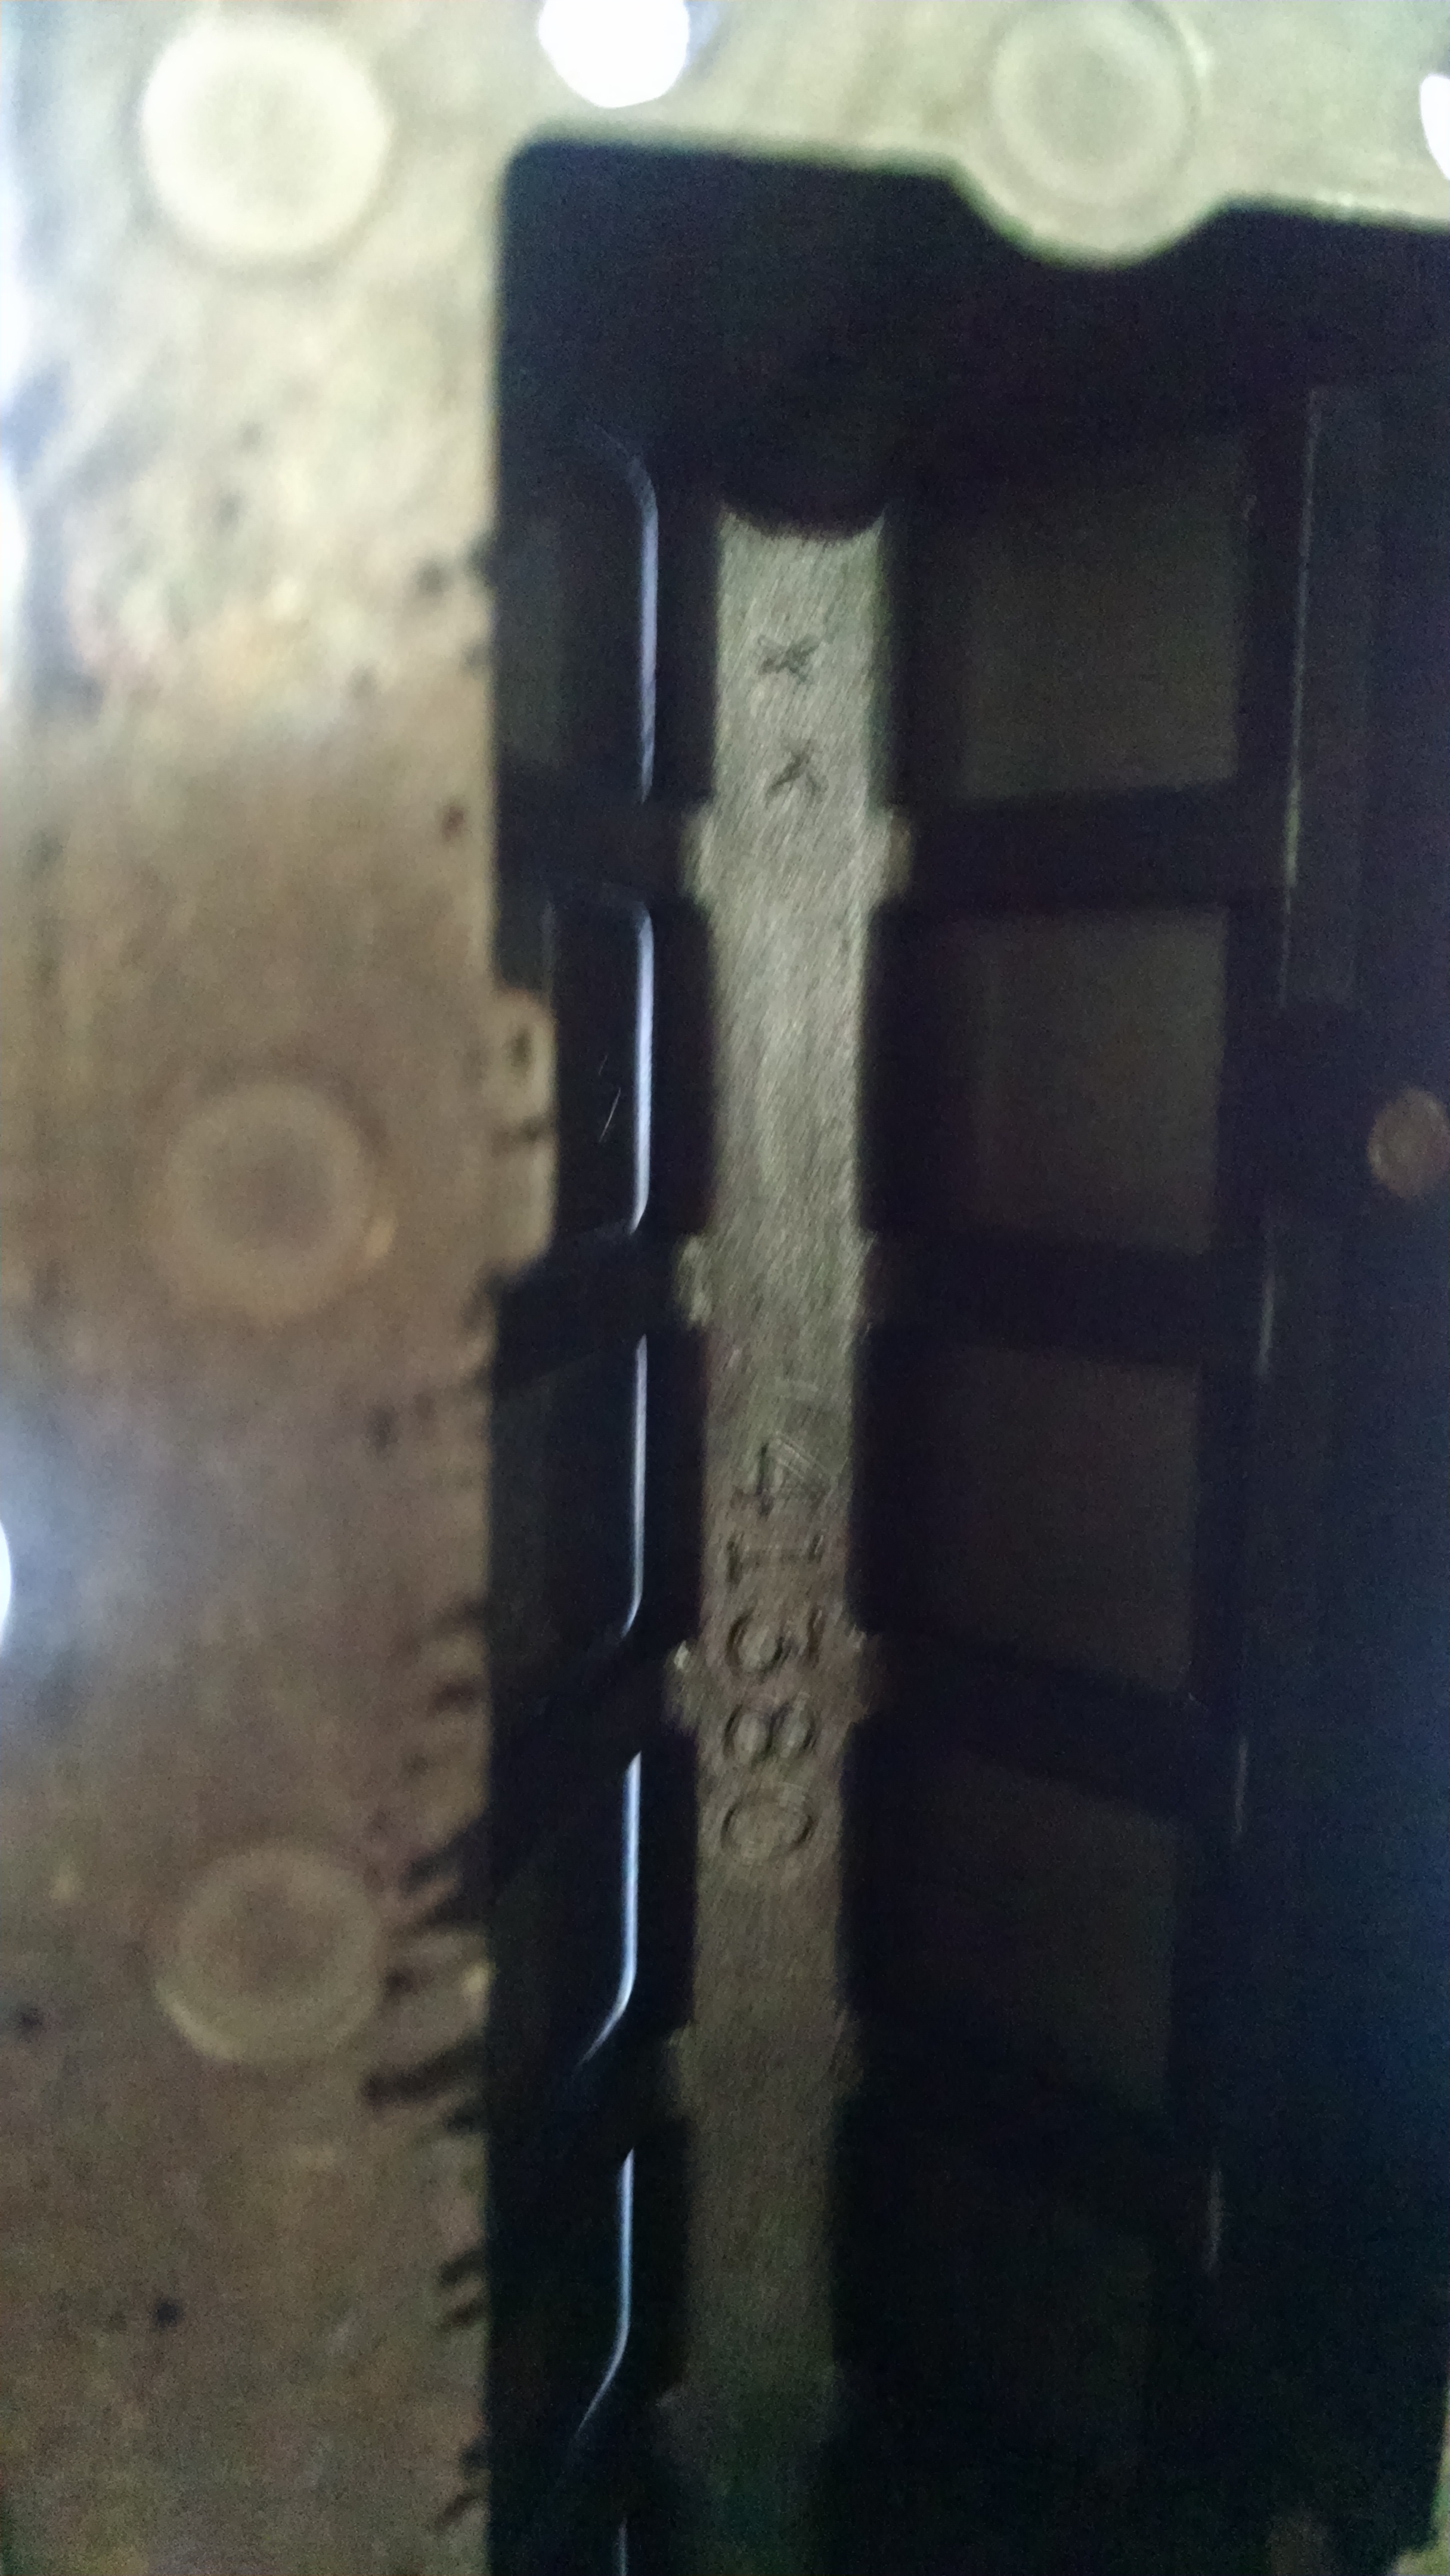
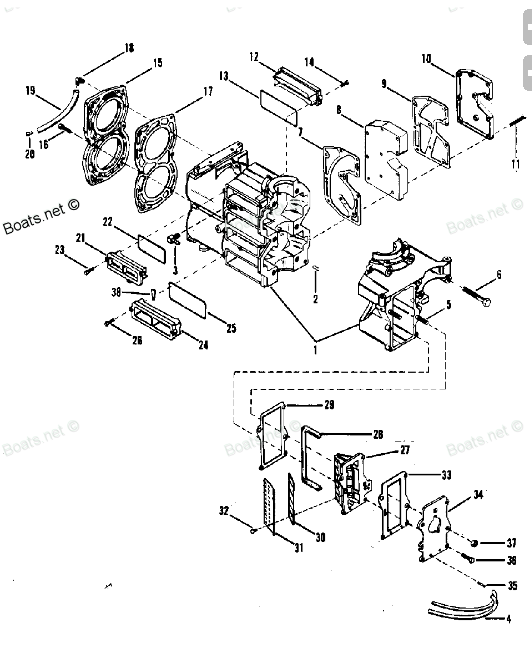
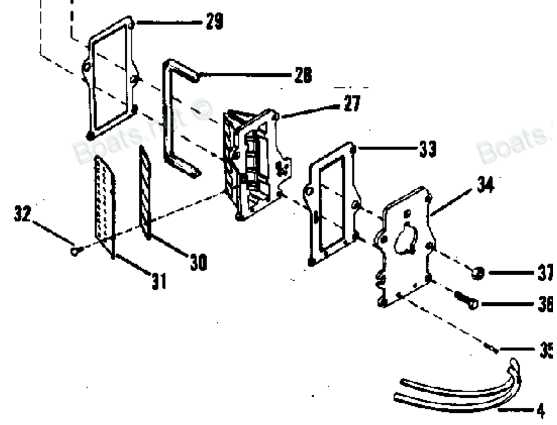
GREMLINS! There we go - there's my vacuum leak. Fortunately, I have the original style reed block which uses separate metal reeds instead of the newer ones where they're all one integrated assembly. Parts #30 in this diagram:
I took the reed stops off and inspected the reeds for metal fatigue - absolutely no sign of it what-so-ever. PHEW! Those are not available anymore and the replacement assembly off newer motors is $85. There was hardly any wear on the painted aluminum seat in the block where the reeds close against, confirming my belief that this motor, despite its age, had not seen much use over the years. First I tried flipping the reeds over, and while better, they still had some gaps so instead I proceeded to gently apply pressure to each reed tab being careful not to bend the thin sections of metal that tie all the reeds together until they all sat tight to the block with the stops reinstalled. This is the result:
No light showing through the individual reeds on either side as it should be. When you think about it, the vacuum lines running into the carb are not any bigger than 1/16th ID, so all these little gaps allowed a comparably tremendous amount of vacuum to be released without going through the carb. Needless to say once it had new gaskets on the reed block & plates and was all put back together it functioned perfectly. Started on the 1st pull & needed the typical carb adjustment common with any carb that had just been rebuilt.
I'm not entirely sure how it got to be this bad, I certainly don't use the motor much each trip - 95% of my time is on the trolling motor (separate diagnosis/repair thread coming on that one.) I'm thinking perhaps using the motor in the cold (sub freezing when starting in the morning warming to above freezing later in the day) might have lead to deformation of these parts, it seems newer reeds are made of a composite material rather than metal possibly for this reason.
THE ISSUE:
Problems started at the end of last year where my motor wouldn't hold idle & would die out if I didn't race the engine. If I could keep it going and get it into gear I could run it with a decent amount of throttle but could not slow down & crawl along without it dying.
First thing I ruled out was a spark issue. That is easy to do with an inline spark indicator, and well worth the $10 they cost to anyone looking to maintain their own motor. I pulled the plugs just to check them & they looked fine, not all coated over in carbon or corroded away etc. Without a spark issue I could for the moment rule out ignition coils, stator, trigger & the switch box - all of the costly possibilities.
PHEW...fuel issue...much cheaper fix (hopefully.)
So I checked the gas delivery to the carb first - primer bulb was solid and as I have clear fuel lines on the motor I'm able to see there was always plenty of fuel getting to the carb - no reason it shouldn't start there. Cleaned the fuel filter for good measure, nothing in there that would be obstructing fuel flow and no indication of water mixing in the gas. All good so far - next up is the carb.
Bit of history on the motor - I swapped the carbs on the motor to up the power from 20hp to 25hp (this is the only difference between the two power variants of these motors, I checked every part number on two motors of the same vintage) but I did not rebuild the 25hp carb at the time I made the switch. It hasn't given me any issues in several years of running it so I suspected the ethanol may finally have gotten to it. These carbs use a rubber diaphragm to use pulses of vacuum from the motor to pump fuel into the carb, so this was a likely suspect.
So I cleaned rebuilt the carb with new gaskets. I snaked all the lines and passages with thin gauge mono-filament and blew everything out on my air compressor to make sure all passages were open & free in both directions. There was no wear or deformation of the rubber tip on the inlet needle valve operated by the float, something that ethanol commonly wrecks. Other common areas are the fuel pump diaphragm and the diaphragm on the enrichment valve, both of which had noticeable cracking, so I thought I'd found my gremlin. Put the carb back together with the new gaskets and diaphragms and tried starting it up again, but the issue persisted.
Now I'm looking for a vacuum leak that would be robbing my carb of the vacuum it needs to function because clearly it has fuel to the carb and spark, and there is no obstruction in the carb itself or issue within the carb that should prevent it from operating. Inspected both vacuum lines, each was flexible and showed no sign of damage, so I dismissed them as possible problems. Next deeper component was the reed block assembly. I pulled this out and started to find more issues. The gasket between the reed block and the cover plate showed no signs of air intrusion, but it had what looked to be pollen deposits on the flat face of the gasket (the tears were when I removed the gasket and were not there prior to me pulling it all apart as best I could tell:
No biggie, I ordered gaskets prior to taking this all apart as I figured after 30 years it was probably not going to survive being pulled apart anyway. I took the reed block and held it up to see if the reeds were fully closed as they should be and found this on both sides of the block:
GREMLINS! There we go - there's my vacuum leak. Fortunately, I have the original style reed block which uses separate metal reeds instead of the newer ones where they're all one integrated assembly. Parts #30 in this diagram:
I took the reed stops off and inspected the reeds for metal fatigue - absolutely no sign of it what-so-ever. PHEW! Those are not available anymore and the replacement assembly off newer motors is $85. There was hardly any wear on the painted aluminum seat in the block where the reeds close against, confirming my belief that this motor, despite its age, had not seen much use over the years. First I tried flipping the reeds over, and while better, they still had some gaps so instead I proceeded to gently apply pressure to each reed tab being careful not to bend the thin sections of metal that tie all the reeds together until they all sat tight to the block with the stops reinstalled. This is the result:
No light showing through the individual reeds on either side as it should be. When you think about it, the vacuum lines running into the carb are not any bigger than 1/16th ID, so all these little gaps allowed a comparably tremendous amount of vacuum to be released without going through the carb. Needless to say once it had new gaskets on the reed block & plates and was all put back together it functioned perfectly. Started on the 1st pull & needed the typical carb adjustment common with any carb that had just been rebuilt.
I'm not entirely sure how it got to be this bad, I certainly don't use the motor much each trip - 95% of my time is on the trolling motor (separate diagnosis/repair thread coming on that one.) I'm thinking perhaps using the motor in the cold (sub freezing when starting in the morning warming to above freezing later in the day) might have lead to deformation of these parts, it seems newer reeds are made of a composite material rather than metal possibly for this reason.