BigTerp's Tracker Sportsman 16' O/B Jet build

TinBoats.net

Help Support TinBoats.net:

This site may earn a commission from merchant affiliate links, including eBay, Amazon, and others.
Man I did the first coat on mine last night. I went to check it this evening and it's STILL tacky! What's your curing time?
 
My curing time seems to at least 12 hours or so. Thats in my rec room at about 72 degrees. I put the second coat on one of the sides last night about 9:00. At 7:00 this morning it was cured. Still seems to have a sort of "film" on it, but I wouldn't call it tacky. What kind of epoxy are you using? Are you sanding in between coats? Giving the bottle of hardenenr a good shake before using?
 
Well maybe that's what it is, just a film. I am using US composites too and shaking real well it just felt kinda wierd. I had the feeling that if I put the sand paper to it it would gum up. I was thinking about not sanding any of because it won't be seen. Unless I need to sand it for adhesion purposes.
 
Yep, it's almost like there is a bit of moisture hanging around on the top of the cured epoxy. I didn't really notice it until after my second coat. The epoxy is definitely hard and seems cured though. Yes, it will gum up your sand paper if you hit it to early. My one side wasn't quite there yet and I tried to sand and it gummed up the paper. I waited until the following evening and it was fine. I would suggest hitting it lightly with some 120 to help with adhesion, but I know some guys don't and it turns out fine. I have 2 coats, front and back, unsanded on mine currently. I'm heading away for the weekend tomorrow so we'll see what 5 days of cure time does. Keep in mind the dry and cure times are for 80 degrees. I have mine in my rec room at about 72. So I was expecting a bit longer cure time.

I plan to drill my mounting holes then applying one more coat of epoxy. Then it will be 2 coats of spar urethane on top of that for UV protection.
 
Sounds good man. I will probably sand a little like you said, sure wont hurt it none. Have a nice vacation man!
 
Looks good Terp! Hopefully when you get back we can see how the new air hammer does! Starting my transom hell, I mean good times now.
 
mcateercustom said:
Sounds good man. I will probably sand a little like you said, sure wont hurt it none. Have a nice vacation man!

Thanks man. Just a quick trip to the beach with the inlaws. Will be looking forward to getting back so I can finish my transom. Good luck on getting yours finished up!!
 
panFried said:
Looks good Terp! Hopefully when you get back we can see how the new air hammer does! Starting my transom hell, I mean good times now.

Yeah man, my air hammer just came in today. Looking forward to giving it a test run on some non transom rivets I need to replace. Good luck with the transom work. It is a rather pain in the butt, but the way I figure it none of us will ever have to touch it again!!! I'm convinced the transom work is one of the more tedious and time consuming parts of alot of our projects.
 
Hey man is there a certain wire brush I need to use like how stiff/coarse or wil just any old wire brush on a grinder work?
 
I like what I have seen you doing...

How has the 1/8 aluminum and 1/16 worked out for you?

On my build I want to use 1/16 for the flooring. I am leaning towards a diamond plate type. I found a 4'x8' sheet for $132 locally and they will cut it.

Did you ever figure out the center seat position and mounting system? I have that same problem.

Talons
 
mcateercustom said:
Hey man is there a certain wire brush I need to use like how stiff/coarse or wil just any old wire brush on a grinder work?

Not sure what your using it for, but I used a regular old wire brush to remove some of the corrosion I encountered. I found that regular 60 grit sandpaper worked better though. This was the only thing I used a wire brush for so far.
 
Talons said:
I like what I have seen you doing...

How has the 1/8 aluminum and 1/16 worked out for you?

On my build I want to use 1/16 for the flooring. I am leaning towards a diamond plate type. I found a 4'x8' sheet for $132 locally and they will cut it.

Did you ever figure out the center seat position and mounting system? I have that same problem.

Talons

Thanks man.

I haven't gotten far enough into my build yet to start purchasing my aluminum stock. That will probably be at least another month or so away. Do a search on aluminum flooring. I read a few were there seemed to be a minimum thickness before you started getting some flex. I don't remember exactly what that thickness was, but thats why I'm going with .125" for my deck and floor.

What I plan to do with my middle seat is to raise the floor up an inch or two with some angle or square across the ribs, if I even need to. I'll let you know how it works out once I get to that point.
 
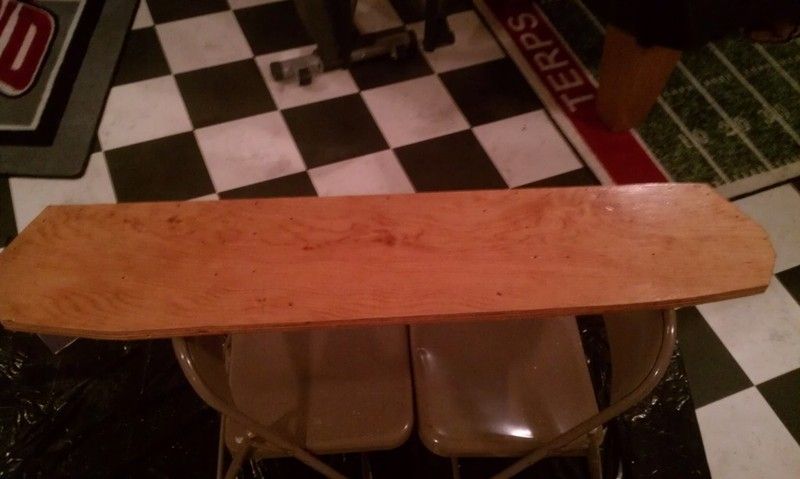
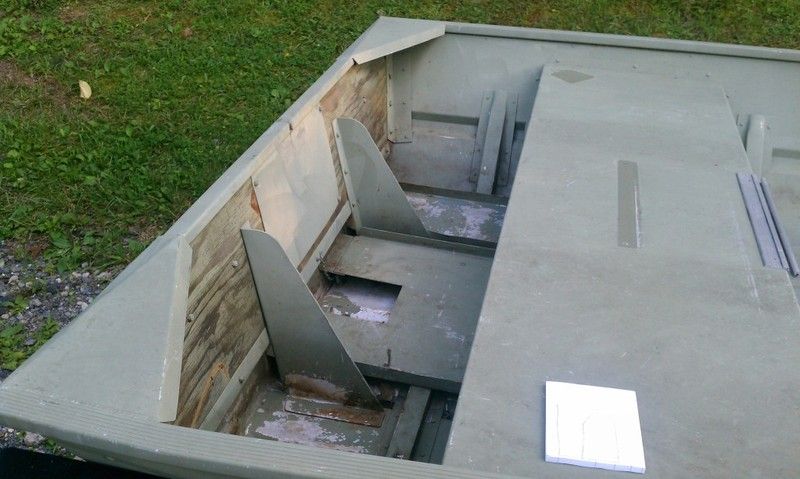
Got back from the beach on Sunday and was able to get the holes drilled in the transom wood and my 3rd and final coat of epoxy resin applied. Also started applying spar urethane which I plan to do 2-3 coats of. It feels like this **** transom has turned into my child. Have gone from watching it born, grow up and now I just want it out of my house!!!! Last night I got to play with my shiny new impact hammer and set a few rivets. Was alot easier than I thought it was going to be.

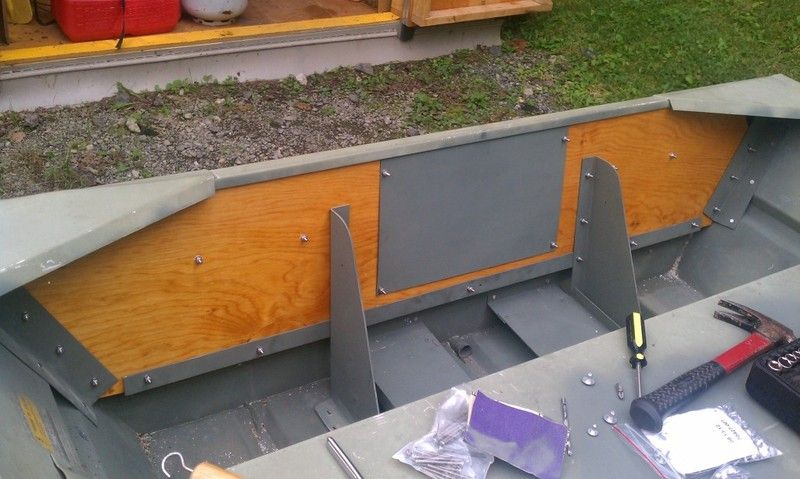
First coat of spar urethane. I'm planning on 2 maybe 3 coats for UV protection.
IMAG0605.jpg


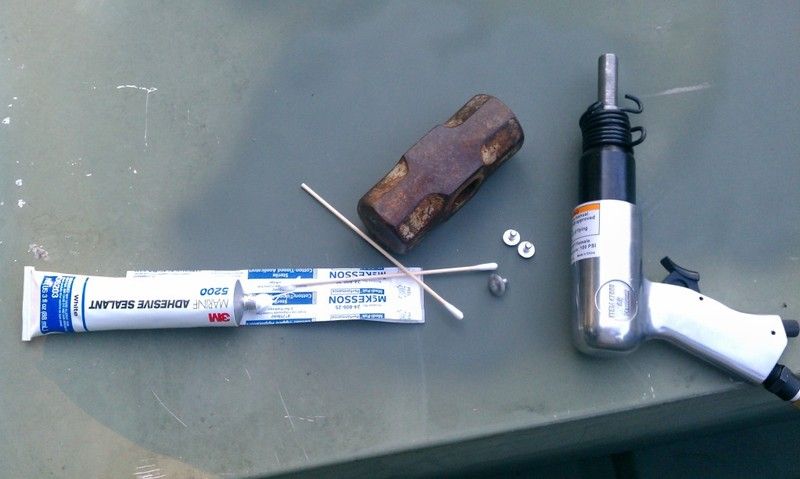
Tools of the trade. I didn't realize, until after I opened it, that you needed to use up the 5200 within 48 hours of opening or it will cure in the tube. Guess I'll have to pick up another tube since I won't be getting the transom put in until probably Monday.
IMAG0599.jpg


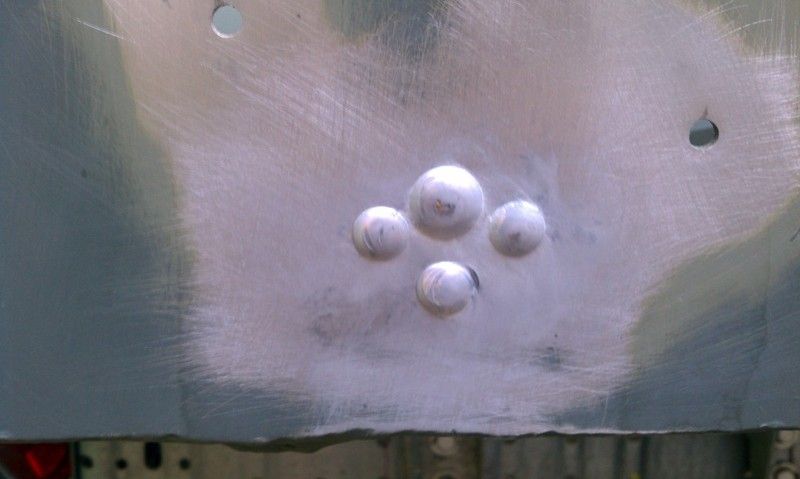
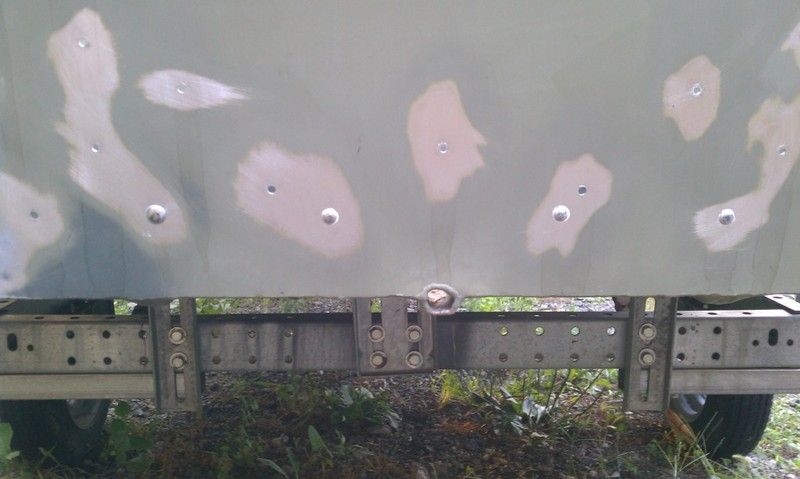
Here is the first few rivets I set. This is sealing the holes that the PO used to mount his transducer. Man is that 5200 messy!!
IMAG0600.jpg


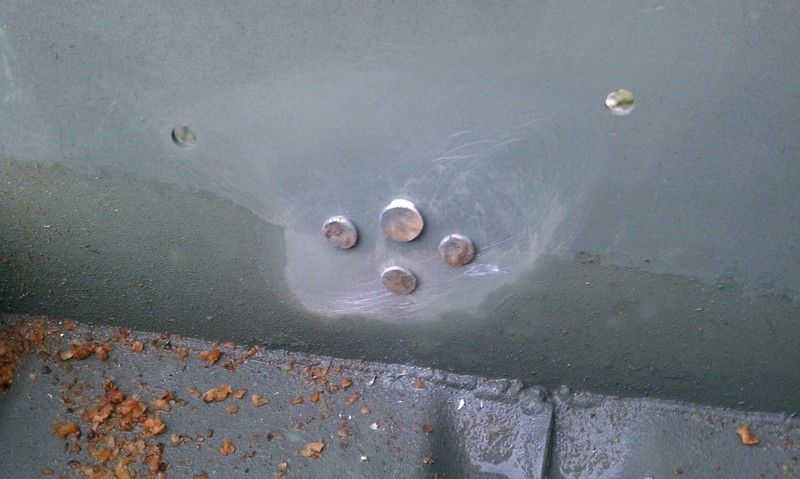
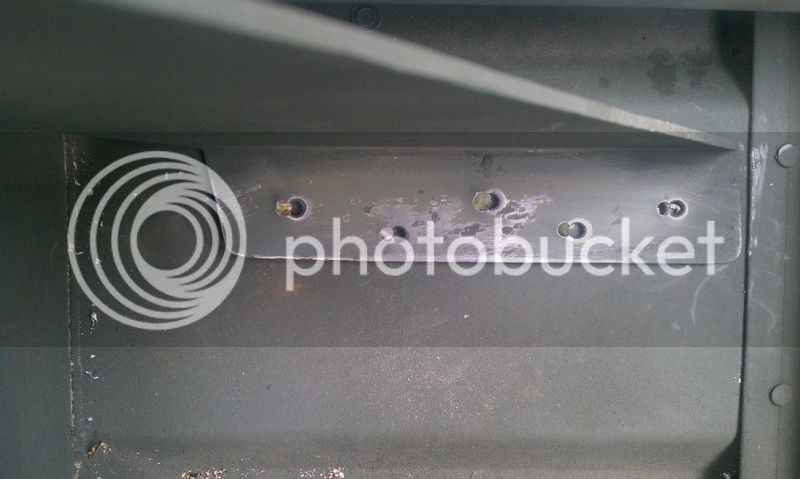
Here is the inside of the transom with the same rivets. Seemed to be set pretty good. Not bad for a first timer.
IMAG0602.jpg


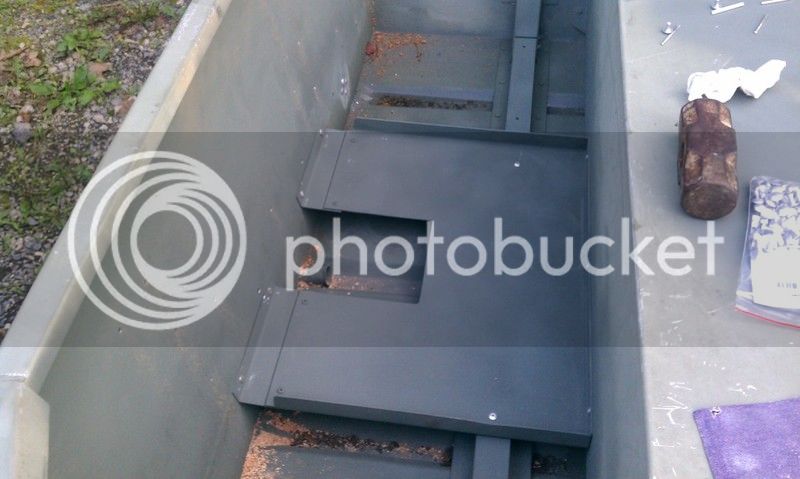
A few more rivets I set. These are holding the gas tank holder in place.
IMAG0601.jpg


Gas tank holder re-installed. Solid rivets are actually easier to work with than pop rivets IMO.
IMAG0604.jpg


I've got a busy weekend ahead, so nothing exicting with the boat will be happening. I've had seaseon tickets to Maryland football ever since I gratuated ('04) and the season opener is Saturday. Then we are having a cookout on Sunday and will be closing the pool on Monday. Need to help my wife get the house cleaned and ready for the cookout. I'm in charge of the rec room which is a MESS since I've been epoxing and sanding in there for the last week :shock: Hopefully I can get my urethane coats done by tomorrow evening so I can have it ready to install on Monday. Then I'll give the 5200 a good week to cure and get this bad girl on the water for the first time!!!
 
FINALLY finished up the transom work yesterday. I'm sure those of you who have done this type of work will agree that it is a long and tedious process. So I couldn't be happier than to be done with it!! Was a bit more expensive and time consuming than I had planned but I'm glad I went the route I did and shouldn't have to ever replace it again. Ended up with 3 coats of epoxy resin (6 on the cut edges) and 3 coats of spar urethane. Held in with stainless bolts, washers and nyloc nuts and solid rivets. All dabed with a bit of 3M 5200. A few tips for those about to tackle the same job.

-Local lumber yards have a much wider variety of wood than the big box stores. You'll likely find your marine or exterior grade plywood in the size you need much easier this way.
-Rough cut your wood, glue and THEN cut to size. Much easier to cut the final piece to size than trying to cut 2 seperate pieces exactly the same size. This also allows you to screw around the perimeter to "clamp" the wood while drying without putting holes in your final piece. It doesn't have to be perfect (mine certainly wasn't) but you want to try and get it as close to the original as possible.
-Epoxy resin is amazing stuff and easy to work with. I'm really glad I decided to epoxy my transom.
-Solid rivets are also really easy to work with. As long as you have an air compresser the tools needed are pretty inexpensive. I have about $30 in an air hammer and 2 different size rivet setting tools.
-A helper is indispensible when setting solid rivets. It's tough to try and use both the bucking bar and air hammer at the same time. It works, but having a partner makes it easier and quicker.
-3M 5200 is messy!!
-Do not drill your new transom holes from the old wood, use the actually transom as a template. What I did was had my wife hold the new wood up to the transom while I drilled the top 2 mounting holes. I then bolted them into place and then, using the existing holes in the hull itself, I drilled out the remainder of the holes. Everything then lined up really well. I did this after my second coat of epoxy. This allowed for the last coat of epoxy and the coats of urethane to seal up the holes a bit.
-Don't be afraid to drill holes in your boat. I had several rivet holes that were wobbled out from my less than perfect removal methods. I drilled them out to the next size and used the approiate rivet for that size hole. Worked great.
-Take a few pictures of the original transom and bracing before you remove it. I couldn't remember how a few pieces lined up but luckly I had taken pictures of the boat when I first brought her home. Was nice having that reference.

On to the pictures!!!
 
Original transom after I brought the boat home and cleaned her up.
IMAG0520.jpg


New transom. I'm actually rather impressed with how it turned out. Need to do a good leak test since I replaced about 30 or so rivets below the water line. I'll feel much better once I get that done.
IMAG0609.jpg


Here is where I ran into a few problems. The bracing didn't quite line up with the original hull holes. No matter how hard I tried they just wouldn't line up. So I drilled new holes in the bracing by going through the original hull holes. This is were solid rivets really worked well!! I was concerned it wouldn't hold well and possibly leak, but the rivets filled in everything really nicely and it was super strong. I forgot to get a pic after I bucked the rivets, but will try and remember to get one this evening to show what I mean.
IMAG0608.jpg


I'll say it again, man am I glad to be done with this!! Need to give the 5200 a good week to cure then I'll give her a leak test and try to get her on the water. Been having a few issues getting the trailer registered but the PO is helping me get that squared away. So hopefully that will get resolved sooner than later.

Won't be doing to much more work to her right now. I plan to fish and hunt her for a bit to get a better idea of EXACTLY what I want to do. This also gives me a chance to start gathering my materials for the rest of the build. Will probably end up being a mostly winter project with plans to be finished up by spring. :D
 
panFried said:
Freakin awesome job! Looks really good.

Thanks man!! It was fun messing with epoxy resin for the first time and learning to install solid rivets, but I'm SO glad to be done with the transom. Honestly, I still can't believe I successfully pulled it off. The leak test will be the real test though. Hopefully everything stays dry!!

How is your transom work coming along??
 
Great job! Looks fricking FANTASTIC!

Want to do mine? HA HA HA!

Talons
 
Top