amateurhour's 14' v hull restoration (new pics 04-15-13)

TinBoats.net

Help Support TinBoats.net:

This site may earn a commission from merchant affiliate links, including eBay, Amazon, and others.

amateurhour

Well-known member
Joined
Jul 11, 2012
Messages
79
Reaction score
0
Location
Nashville, TN
After over a year of lurking here I finally get to make a thread because I finally got a boat!

I traded a $200 Bass Pro gift card for a 1970's Aluminum V hull that was listed as a Sears (but Vermonster pointed out it's actually a Richline), a trailer, and a Briggs and Stratton 5hp (air cooled) outboard. Definitely not a bad deal for a $200 gift card right?

I told this story in the boat thread but when I brought the boat home the trailer made it 4 out of 7 miles smooth sailing. It rode very well. Then the freaking back right tire popped off the wheel halfway (the guy aired up the tire before I left as it was flat and I think it just offset it from the wheel) leaving me on the side of the highway. So here I am first night owning my first boat with no clue how to fix this scenario. I was pretty much just going to take the back road home anyway so I drove on the wobbly tire and it managed to get me home (it even popped back onto the wheel a few times) until about 3/4 of a mile from the house where it came off the wheel entirely. So I went the rest of the way on the rim, going very slowly, and hoping I wouldn't get pulled over or anything.

Thankfully the boat made it home safely and was tucked away in the garage.

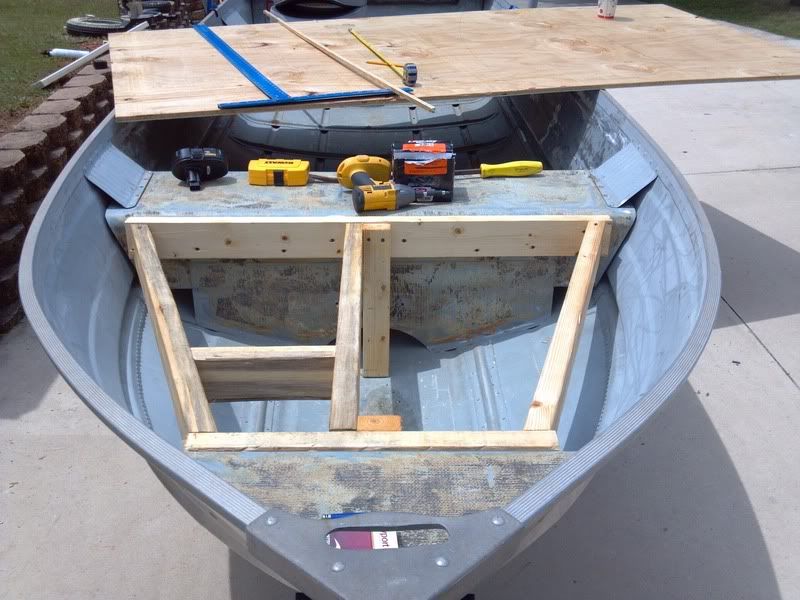
I started the tear down this weekend and I've gotten a little bit of work done. I've got the before pics and some progress pics. I plan to replace both wheels/tires on the trailer and get a spare as well. The electrics, hand winch, and padding on the trailer is still in good shape so the only thing it should really need is repainting.

The Before Pics:

The front view (note the tire-less wheel :) )

022413boatfront.jpg


Side view

022413boatside.jpg


Side view (continued)
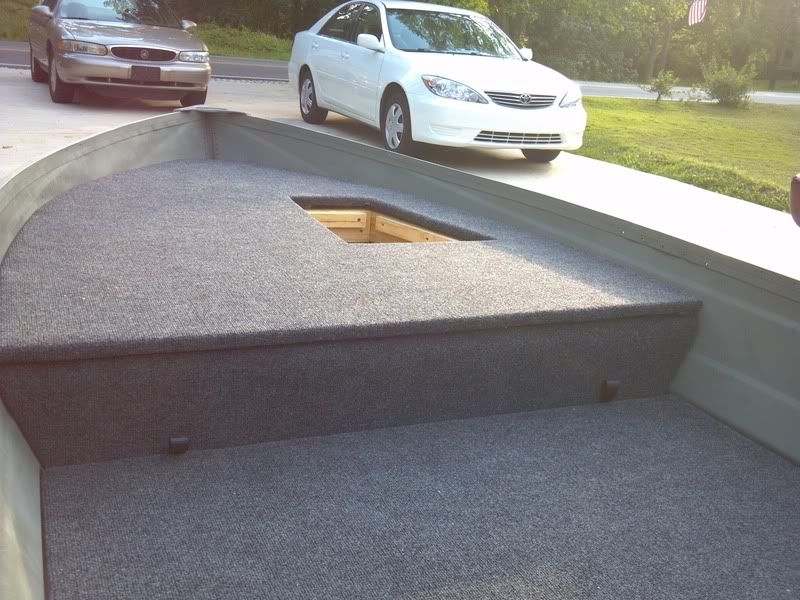
022413boatside2.jpg


Interior

022413boatinside.jpg


Back (apparently it already has a name. Is it bad luck to rename a boat?)

022413oldtimer.jpg


PROGRESS PICS:

The first thing I did is try to get the motor off, but it was padlocked to the transom so after searching for a pair of boltcutters I decided that a hacksaw would be enough to take out the plastic around the lock. It now sits safely on my "motor stand"

Stupid Lock

022413stupidlock.jpg


Motor Stand

022413motorstand.jpg


So the boat actually has two nice folding seats, and the front one has a nice support swivel plate too.

022413seatplate.jpg


022413oldwood.jpg


So I removed those and then took the wooden bench off the front seat to find...

022413seatsopen.jpg


FOAM! But not nasty old foam, so it must have been replaced pretty recently. Regardless, I took it out, and each bench has two long sheets in it so I'll need to replace that.

Work work work, out go the seats and foam.

022413frontseatclean.jpg


022413middleseatclean.jpg


022413twodown.jpg


I managed to get two seats done today. After I got the motor off from the back I was left with this:

022413bigmess.jpg


As you can see, it's a mess. I took out a homemade wooden battery holder and noticed the makeshift toggle switches for the bilge pump and an older eagle depth finder up front which I'll probably get rid of in favor of a better fish finder.

022413switches.jpg


022413wiring.jpg


So I'll need to replace those switches for a proper fuse box...

Lastly, I found the drain hole and drain plug, which barely sits in the drain hole, so I need to replace/fix that, because I don't want to sing

022413drainplug.jpg


So that's it for now. I've still got a lot of work to go. Priority one is to finish tearing down the boat, and then get the wheels for the trailer. Then I'm getting a gas tank and gas line for the motor and make sure it's good to go, then I'll strip and prime the boat and fix any holes or leaks in it.

So you experts let me know what I'm missing or if I'm doing anything wrong. I'm excited because this is my first boat and I think it will be perfect for fishing the lakes in Nashville and camping out on the islands on said lakes.

More updates to come!
 
I like that motor stand. :lol: The first thing I noticed was the seats and bases. Real nice, and the anchor mate. That boat could be a real looker with a little work.
 
Thanks for the feedback.

So here's what I'm planning to do. I want to basically extend the front bench into a deck using support frames underneath and have a raised seat for casting and storage underneath. The front bench only goes halfway to the floor of the hull and was originally meant for storage anyway so it seems like a no-brainer. Here's a very crude mockup of what I'm planning.

mod1.png


mod2.png


Does that seem realistic? That way I get the benefit of a casting deck but I don't lose the seat. I'll have to small or one medium sized storage compartment and/or livewell closer toward the front.
 
Gonna be a fun project. Out of curiosity, the foam under the seat, was it floatation foam? It looks like the type you use for a cushion and would soak up water like a sponge! Of course, this is just based on the pic.

Can't wait to see the progress!
 
billhowardoutdoors said:
Gonna be a fun project. Out of curiosity, the foam under the seat, was it floatation foam? It looks like the type you use for a cushion and would soak up water like a sponge! Of course, this is just based on the pic.

Can't wait to see the progress!

As far as I can tell it was indeed some type cushion foam, and it was still wet in a few spots where it had rained a few days before I took it home, but it was dry as a bone and still looked pristine throughout most of it, which was weird. It was WAY more firm than cushion foam though in the sense that it broke apart like Styrofoam when you put the slightest pressure on it. Whatever it was looked to be an aftermarket job, but judging by the shape of the benches it had been in there a while unless they put the same ratty benches on top of new foam.

I'm going to replace it with the lowes stuff though.
 
That is exactly how I plan to do my front deck. I think the hardest part will be making sure the deck is level with the waterline. The bench would support the rear of the deck just fine. The front of the deck where it meets the bow will take some imagination and fiddling, but it could be made to work and be plenty stout.
 
If you're just extending that Bow seat to the next deck - it will be fairly close to how she should sit in the water. I'm happy with how mine sits anyways.

Obviously this depends on what else you have in the boat and where it sits. It's all about balance. Think about where your weight is. I'm 200 lbs.

Between the bow seat and the 2nd seat there should be 2 ribs that are slanted inward towards the center line of the boat. You may want to add a center post support right there for your deck. Just as added support. Be careful to only drill through the rib and not the hull! I say this because that front bow seat is kinda flimsy as it is only riveted to the sides of the boat. Rivet 3/4" aluminum channel to the ribs so the channel is facing up, and then mount one or two vertical 3/4" square aluminum tubes that would be deck height.

Kinda like this:
IMG_1043.JPG

But here on your boat:
mockup.jpg
 
Vermonster those pics are definitely helpful! I do have those two angled brackets toward the front of the boat (I don't have the smiling bracket behind them though) I had originally planned to just build a wooden frame like so \_|_/ (x3 going from the back to the front, getting smaller as they go forward) to support the deck but the aluminum looks better.

Did you weld that in or use rivets? Just curious.

Either way something along those lines is what i had in mind. I was just going to extend from the little front seat to the second seat with a /\ shape piece of carpeted marine plywood and rig up some kind of proper support underneath and add a latch and use the area for storage, as the seat would still be where the second bench is now.

On the restoration front things are going well. I've borrowed some tools from a friend and I'm picking up some of those wire brushes (not the cups) and some rustoleum self etching primer this weekend, so expect more pictures.

WOO!

Oh, also, no one told me how freaking expensive a 3 Gallon marine gas tank and fuel line costs. So far the cheapest ones I've found for that briggs and stratton motor are between $80 and $100 for the set. Anywhere to get that cheaper?
 
Off to a good start. Gonna be a nice solid boat,

I did my deck the same as vermonster by using the bow seat and front bench as part of the deck support. And it sits level in the water.

2012-05-22_19-22-45_778.jpg
 
I like that! I was planning to do mine flush with the top of the front bench seat and maybe even making a thin storage section where the deck would come back from the front bench 6 or 8 inches. I would have my center bench,enough foot room, and still get plenty of storage under the front deck/seat area.

This site sends my imagination into overdrive. I was just planning to do a teardown and "restoration" at first. I was pretty much just planning to carpet the benches and paint the boat. last night I made the mistake of letting my imagination run crazy while at Lowes. #-o I bought 48 sq feet of carpet....I don't want to waste it [-X ...might as well incorporate a front deck while I am doing all this other stuff. :mrgreen:
 
I got 4 linear feet off of a 12 foot wide roll. I'm sure it is nowhere near as nice as some of the higher end marine carpets, but I won't feel bad about getting this stuff dirty either. It was 6.24 per linear foot. I got a quart sized container of outdoor carpet glue, the carpet, and a few other little doodads for under 36 bucks.
 
amateurhour said:
awesome! I don't suppose you still have your measurements for those wood cuts still lying around? : )

No didnt save any measurements. Pretty simple for the supports. To get the deck shape I layed my template on top of the gunwhales and traced it from underneath on one side than used it to draw on plywood

I used self tapping screws into the bow and bench seat than you can see how I started adding supports. Ive recently pulled it back off and turned most of the bench into another storage compartment. Not sure how its gonna affect strength. But ill beef it up if need be.

2012-05-17_13-04-43_969.jpg
 
amateurhour said:
awesome! I don't suppose you still have your measurements for those wood cuts still lying around? : )

Best advice - get some cardboard and cut out a template (piece some together if you need to.. Then just trace the template shape onto the plywood.

I didn't bring mine all the way back to the the 2nd seat which is why support is on the bracket that runs straight across the floor. My boat is the Sportsman model which only has 3 seats total. Yours has 4 and I think is a bit bigger.

I riveted everything and it's SOLID! You can pick up rivets and a nice hand rivet tool for $25 at Home Depot. It's easier than it looks. I cut all the angle with a jigsaw (metal blade) until the jigsaw broke (it was a POS) - after that I used the old hacksaw until I replaced the jigsaw.
 
No pics this week but I finished gutting the boat. I took out the back bench and the little front kids seat and all the previous owner's makeshift wiring.

There are only four holes that were put into the boat that are non factory. They're both below the water line where he mounted the external attachment for the fish finder. It looks like he drilled two holes, then moved it to the right (it was likely too close to the prop in the previous spot) and he filled in the two original holes with some kind of adhesive.

I picked up a wire brush and some rustoleum self etching primer while I was out and started working the metal. I got a few feet done, nothing major. It was more to learn what I'm doing than anything.

I'm borrowing a big industrial size power sander with some wire brush discs and a small air compressor from a co-worker so next weekend I plan to blow out all the leaves and such and at least finish the inside of the boat. The guy is also loaning me a gravity paint gun for the air compressor so I was wondering two things.

1) Does the self etching primer come in anything other than the rattle cans so that I can use it with the gun?

2) If not, is there a primer that does work with a gravity feed gun that I can use in place of the rustoleum?

I'm also picking up a can of the rustoleum truck bed liner and a roller brush to take care of the inside (which I'm going to do first, as it's not painted so all I need to do is clean up the metal. Do I still need to use the primer first or can I just lay down a couple coats of the truck bed liner on the inner hull bottom?

Thanks!
 
Finally got some time to get some more work done. Like I said I finished stripping the boat except for the transom. I have no clue how to remove this thing so I've attached pics and would love some advice. All the nuts and screws have been removed.

032813transom.png


On a better note, I started taking the wire brush to the aluminum and while I'm slow, I'm making progress

032813gettingcleaner.png


032813polished.png


But as you can see, I've got work to go...

032813worktogo.png


Thanks for checking out the thread, and I appreciate any help with the transom question or my previous questions about self etching primer that doesn't come in a rattle can since I have access to a paint gun now. I've also got a power sander with some wire brushes as of tomorrow so I plan to make short work of the rest of this baby over the next few weekends.
 
Got the transom out so the boat is 100% stripped! Also finally cleaned out all the dead leaves and junk and it's a solid boat, no holes or cracks, WOO!

Here's the transom out, the aluminum behind it is in good shape.

033113notransom.jpg


033113cleantransom.jpg


However I did realize that I suck at drilling out rivets. I got the caps off the rear of the boat perfectly, but getting the transom brace off was a comedy of errors. As you can see two of the rivets are still in there a fair bit.

033113badrivets.jpg


I did get a lot of work done though, I got about a quarter of the interior done but I've still got a lot to go. At least it's clean now.

033113gettingthere.jpg


033113somuchwork.jpg
 
Top